RSS Feed

Tag Archives: handmade

Jurassic Birthday

If you remember last week, we left off with me having a semi-nicer backyard and wanting to find a way to showcase and share it with my closest friends. I thought of making an event called “We-Got-Our-Garage-Painted-We-Have-A-Gazebo Party”.

But my son had other ideas.

My son M always wants to have an outside birthday party. But his birthday is in the cold months of Michigan winter. So he decided we should have a summer birthday party for him. We had just seen the new movie Jurassic World: Fallen Kingdom. This influenced us to want a Jurassic theme. We brainstormed and my son had some very specific requests:

1. A T-Rex to greet people with a party hat.
2. A “When Dinosaurs Ruled The World” Banner

Among other things.

And I am guilty in all of this as well. I went from thinking about a Jurassic Park theme to turning our backyard into an actual Jurassic Park.

And my son just assumes all mothers have these magical abilities to make multiple large-scale decorations from scratch. He did doubt that I could get them all done in time. Shows what he knows.

Before I present the photo gallery of the completed party (Oh ya, there is a video too.), I wanted to let you know that I had two distinct seating areas with their own multi-media experience. Inside the gazebo I had the score to Jurassic Park playing on a Bluetooth speaker. On my patio I had the movie Jurassic Park playing on my laptop.

A great idea if you wanted to take it a step further is to project the movie after dark. Unfortunately, we did not have the resources for that to happen.

Enjoy!

“Welcome to Jurassic Park!”

Welcoming T-Rex. So realistic that my dog barked at it while I was making it.

The Visitor Center

Jurassic Park Ford Explorer photo op.

Don’t Touch!

The T-Rex escaped its enclosure!

Park Information board

YouTube link:

Your past shapes you. It can’t be undone.
ANGRY MACEY
NOW AVAILABLE $.99!

HALLOWEEN 2017: DIY Unicorn & The Terminator

This year for Halloween I really wanted to be Harley Quinn. (I did last year, too). But, I didn’t want to spend the money on the costume and I did not want to freeze during Trick or Treating. So, I ended up being a unicorn. Which, by the way, cost about half what the Harley Quinn costume would have cost me and I still froze during Trick or Treat, although not as badly.

To make the unicorn, I relied on this YouTube video: https://youtu.be/thnF6i3IDBY
And also this website: https://www.makeit-loveit.com/make-unicorn-hoodie-30-minutes/
And the rest I made up as I went along.

First get a hoodie to decorate in the desired color. At first I considered a bright pink one from Hobby Hobby that was zipperless. But I had already fallen in love with the grey hoodie on the makeit-loveit website. Plus, zipperless hoodies tend to pull on my neck and annoy me. I figured the added weight of the mane and the horn would only make that worse. I bought my plain grey hoodie in the men’s department at Walmart. I recommend a hoodie with drawstrings so you can tighten them if you need to. I actually tied scrap strips of fleece to my drawstrings. I could tighten the drawstrings and slide up the fleece to hold it in place, holding them without having to tie a silly bow.

Then I gathered different colored scraps of fleece from my own collected and the scrap bin at JoAnn’s and Hobby Lobby. I only needed a little, so they were relatively inexpensive. I found the silver material for the horn there too.

Mane sewed on, but not yet cut into strands

My horn is maybe 7 inches tall here. I wrapped it with gold ribbon. A gold horn with silver ribbon would work just as well. The way I made my ears, they didn’t stand up so well, so feel free to improve on the design.

The full horn and ears.

Once I got the horn sewed on, I realized it was just way too long. I removed it, cut off about 2 inches, and sewed it back on again. If you want to be able to wear your horn in the car, you could take off even more.

I was feeling horny! This is the too long horn.

I had cut off the leading (trailing?) edge of the fleece. I was just going to discard it, but it turned out they made for a great tail. I attached it with a large safety pin. I layered more fleece on the inside so that the pin wouldn’t rip the jacket if it got pulled on on accident.

Finished mane and tail

Here is a picture of my finished costume. Please realize that I am not that fat. Well, not quite. I had on five layers, including a raincoat as a windbreaker which was a total lifesaver that night.

My son went as the Terminator. All he needed was the right sunglasses, a $3 thrift store leather jacket, and a $1 gun from a yard sale. He wanted me to be Sarah Conner. But that would just be the same costume as when I was Jennifer to his Marty McFly–my old 80s clothes. And no one would know who I was. For more on the Marty McFly costume, click here: https://imnotstalkingyou.com/2015/10/27/crafting-a-cardboard-delorean/

Finished costumes

Have fun making your own unicorn costume!

For more on how The Terminator is actually a love story, click here: https://imnotstalkingyou.com/2014/07/16/the-movie-terminator-is-actually-a-love-story/

Your past shapes you. It can’t be undone.
ANGRY MACEY
NOW AVAILABLE $.99!

Paint It Like It’s 1988: DIY Child’s Coat Rack

When we moved into our 100 year old house in 2004, there were already shelves and coat racks and key racks screwed into the walls. I eliminated the shelves that were in what we referred to as “the dog room” when it became “the nursery”. That is before it was the “man room.” They were white and wire and, in my opinion, ugly. I ripped out the one that was in what is now my son’s bedroom as well.

The coat rack and key rack by the back door I left untouched. We actually use the front door more than the back, so we always find ourselves walking to the back door to get our coat, then walking back to the front to leave. The keys that hang on the rack back there are ones we almost never use. The ones we need for cars and houses and our mothers’ houses we carry with us.

When we redid a bedroom upstairs for my son last year, we made him a cool train room [You can see it here: https://imnotstalkingyou.com/2015/08/05/ms-train-station-bedroom-my-new-upstairs/], complete with a coat rack that looks like a train sign. (We made a white one, he wanted the round yellow one. Le sigh.) It is great for his robe and baseball hats and such, but if we are leaving and I send him upstairs for a coat, he will get sidetracked and never make it back down again. The coat rack by the back door, while useful, was not very functional for a shorty like my almost six year old.

So, I came up with the idea that I needed to make him his own coat rack that he could reach downstairs. I was so fed up last spring, that I wandered into the local Habitat for Humanity Restore. (If you don’t know about these places and their treasure-trove of recycled goodies, look into it.) Twenty minutes later I walked out with an old oak board and enough hardware to handle coats for an army of children. I don’t remember the exact amount, but it seems like it was around $5 for my haul that day. I always intended to splatter-paint it with the leftover paint from my upstairs revitalization project, but never got to it all summer. With autumn’s cold mornings, it became necessary once again.

The completed board. The paint is still wet here.

The completed board. The paint is still wet here.

So, one day I designated as “paint day”, my son and I went out in the front yard in our junky clothes and painted his proton pack for Halloween, as well as the board for this project.

My son did all the painting himself. He did an excellent job, even if it is slightly more paint than I myself would have used. He had fun. And it got done.

Manly husband with power tools doing installation. Ahr, ahr, ahr. Now, where did we leave those studs???

Manly husband with power tools doing installation. Ahr, ahr, ahr. Now, where did we leave those studs???

While I have my own drill and bits and hoped to do the whole project myself, I am a giant loser wuss woman and had to have my husband come in and save me to screw on the hardware and attach it to the wall. But I think it came out pretty sweet!

Finished product. Reminds me of a New Kids on the Block shirt that I used to own.

Finished product. Reminds me of a New Kids on the Block shirt that I used to own.

Now, if only my son would quit wearing his coats to school on cool mornings and then LEAVING THEM IN HIS LOCKER instead of bringing them home. His coat rack looks a little empty at the moment.

Follow the romantic entanglements of The Riley Sisters in my books:
Be Careful What You Wish ForAVAILABLE NOW!
When You Least Expect It THE CONTINUING ROMANCE!
The Wind Could Blow a BugWHERE IT ALL BEGAN!

Save

Who You Gonna Call?

My son has gone through many ideas in the last year of what he would be for Halloween 2016: Scooby-Doo, Gizmo, etc. Some would require more work than others on my part. And my heart is still kind of in love with his Marty McFly from last year, his obsession so perfectly timed with Back to the Future Day. You also can’t discount the reusability of that costume, which totally still fits him this year.

But about two months ago, he settled on being a Ghostbuster. We had received a Ghostbuster costume many months ago, just for playtime. So, that was already taken care of. But, well, my demanding son demanded a proton pack.

Oy.

So, I present to you, a step-by-step on how I made my son a proton pack.

I took the back panel and straps off of a holey old backpack and glued them to a piece of cardboard. I added on a bunch of crap from the recycling bin and glued or taped it on as best as I could.

Recycled crap. The partial backpack and straps and cardboard are under this stuff.

Recycled crap. The partial backpack and straps and cardboard are under this stuff.

NOTE: I tried to avoid using cardboard as much as possible, since it tends to precipitate around here on treat-seeking holidays.

I bought some black spray paint and sprayed it all because it seemed way faster than hand painting it all. And it was.

Melted styrofoam, which I had to substitute out at the last minute.

Melted styrofoam, which I had to substitute out at the last minute.

NOTE: Apparently some types of Styrofoam melt when they come in contact with spray paint. Before using a large quantity of it for this project, you should probably test it first and see if you will have this issue. I had to make a minor adjustment for my son’s costume.

Secured with hot glue and Gorilla Tape, prior to painting.

Secured with hot glue and Gorilla Tape, prior to painting.


Old clothes and the great outdoor made for good spray painting conditions.

Old clothes and the great outdoors made for good spray painting conditions.

I glued on some color elements I purchased from Dollar Tree, such as a sound tube and jump rope.

The painted pack with added color elements.

The painted pack with added color elements.

I got glow sticks from Dollar Tree as well. I taped them onto the gun to make it glow. I also make it so that I could slip them into the egg cartons and it would glow. It looks cool, was easy, and provides better visibility to a shorty on Halloween.

The finished product, bustin' ghosts! (Glow sticks not yet attached.)

The finished product, bustin’ ghosts! (Glow sticks not yet attached.)

Can you tell that I am just not quite as passionate about this project as I was last year about making a DeLorean time machine out of cardboard and duct tape? While not movie quality, the proton pack was relatively easy (except for my glue gun is a piece of shit), and size and weight appropriate for my almost six year old boy.

The finished proton pack in action.

The finished proton pack in action.

AND this is an AWARD WINNING costume!!! He WON Funniest Costume at the YMCA for his age group.

Me, well, I of course wanted to be Harley Quinn this Halloween. Ponytails with multi-colored hair? It is like she was the comic book character created just for me. But in practicality, ponytails do not a Harley Quinn costume make. And while it will not deter many others, I neither have the body nor the inclination to run around half-naked on a cold Halloween night in Michigan (anymore).

So, I went with my most recent obsession: WKRP. I present to you, Miss Bailey Quarters. For some fan fiction featuring Bailey and Johnny, please click here: https://imnotstalkingyou.com/2016/10/12/wkrp-baby-if-you-ever-wondered-what-would-happen-if-johnny-bailey-got-together-part-1/

I just HAD to have the Black Death shirt.

I just HAD to have the Black Death shirt.

Now, I realize my glasses aren’t big enough, but I need to wear my regular glasses so that I can, you know, cross the street and see and stuff. This is from the episode Rumors. I ordered the Johnny Fever shirt from CafePress.com. I was really happy with it. I ordered a medium and it was a little big, but I kind of wanted it to be so that I could procure the illusion that I rolled out of bed in the morning and borrowed it from Johnny himself. You know, the same story Bailey gives the staff at WKRP.

My WKRP jacket I made. Attached with safety pins for easy removal.

My WKRP jacket I made. Attached with safety pins for easy removal.

And…

My favorite WKRP in Cincinnati meme. Because I made it.

My favorite WKRP in Cincinnati meme. Because I made it.

Just because I can.

Follow the romantic entanglements of The Riley Sisters in my books:
Be Careful What You Wish ForAVAILABLE NOW!
When You Least Expect It THE CONTINUING ROMANCE!
The Wind Could Blow a BugWHERE IT ALL BEGAN!

Crafting a Cardboard DeLorean

During the summer, my son became obsessed with Back to the Future Part III, because he loved the train at the end. In fact, usually he would only watch the end of the movie just to see the steam engine.

But in the months since, we showed him the other Back to the Future movies as well. He learned who Michael J. Fox was. My husband and I are not the only children of the 1980s that expose our children to the things we loved. My 4 3/4year-old son M’s BFF is heavily into Ghostbusters.

I must admit, I was a little sad that my son was in love with a 30 year-old movie. He would never be able to see the toys in the stores, or it talked about or advertised on television. Memes would be rarely seen on Facebook.

My son expressed interest in being either Marty McFly or Gizmo from Gremlins for Halloween. I gently ushered his taste toward McFly.

We took a trip up north to Mackinac Island. The first moment we walked onto the street, he saw some horses hitched up to a carriage. M pointed out that it looked like in Back to the Future III when Doc and Marty hooked up the DeLorean to horses to try to get it up to 88mph.

“Oh, I guarantee you that you will not see a DeLorean anywhere on this island. I bet you a million dollars right now that we won’t find one.”

I owe my son a million dollars. Not only did one of the stores on Main Street have ReAction figures by Funko, but also a Funko Pop DeLorean collectable.

Soon after we learned of the impending “Back to the Future Day”, October 21, 2015. It is the day that Marty McFly arrived in the future in Back to the Future Part II. It is the date furthest in the future within the movie franchise. (Now everything in the movies takes place in the past 😦 ) Having already assembled M’s costume for Halloween, I sent him to preschool that day in the most comfy aspects of it. And Back to the Future was ALL OVER television and social media that day. (Are you getting the “never say never” vibe yet?)

Ahead of Halloween, we also wanted to go to a trick or treating event that our local zoo holds, called Pumpkin Path. While his Marty outfit is so McFly, I just couldn’t help but think it would benefit from a DeLorean.

Marty McFly & Jennifer. Anyone even know what her last name is in the movie???

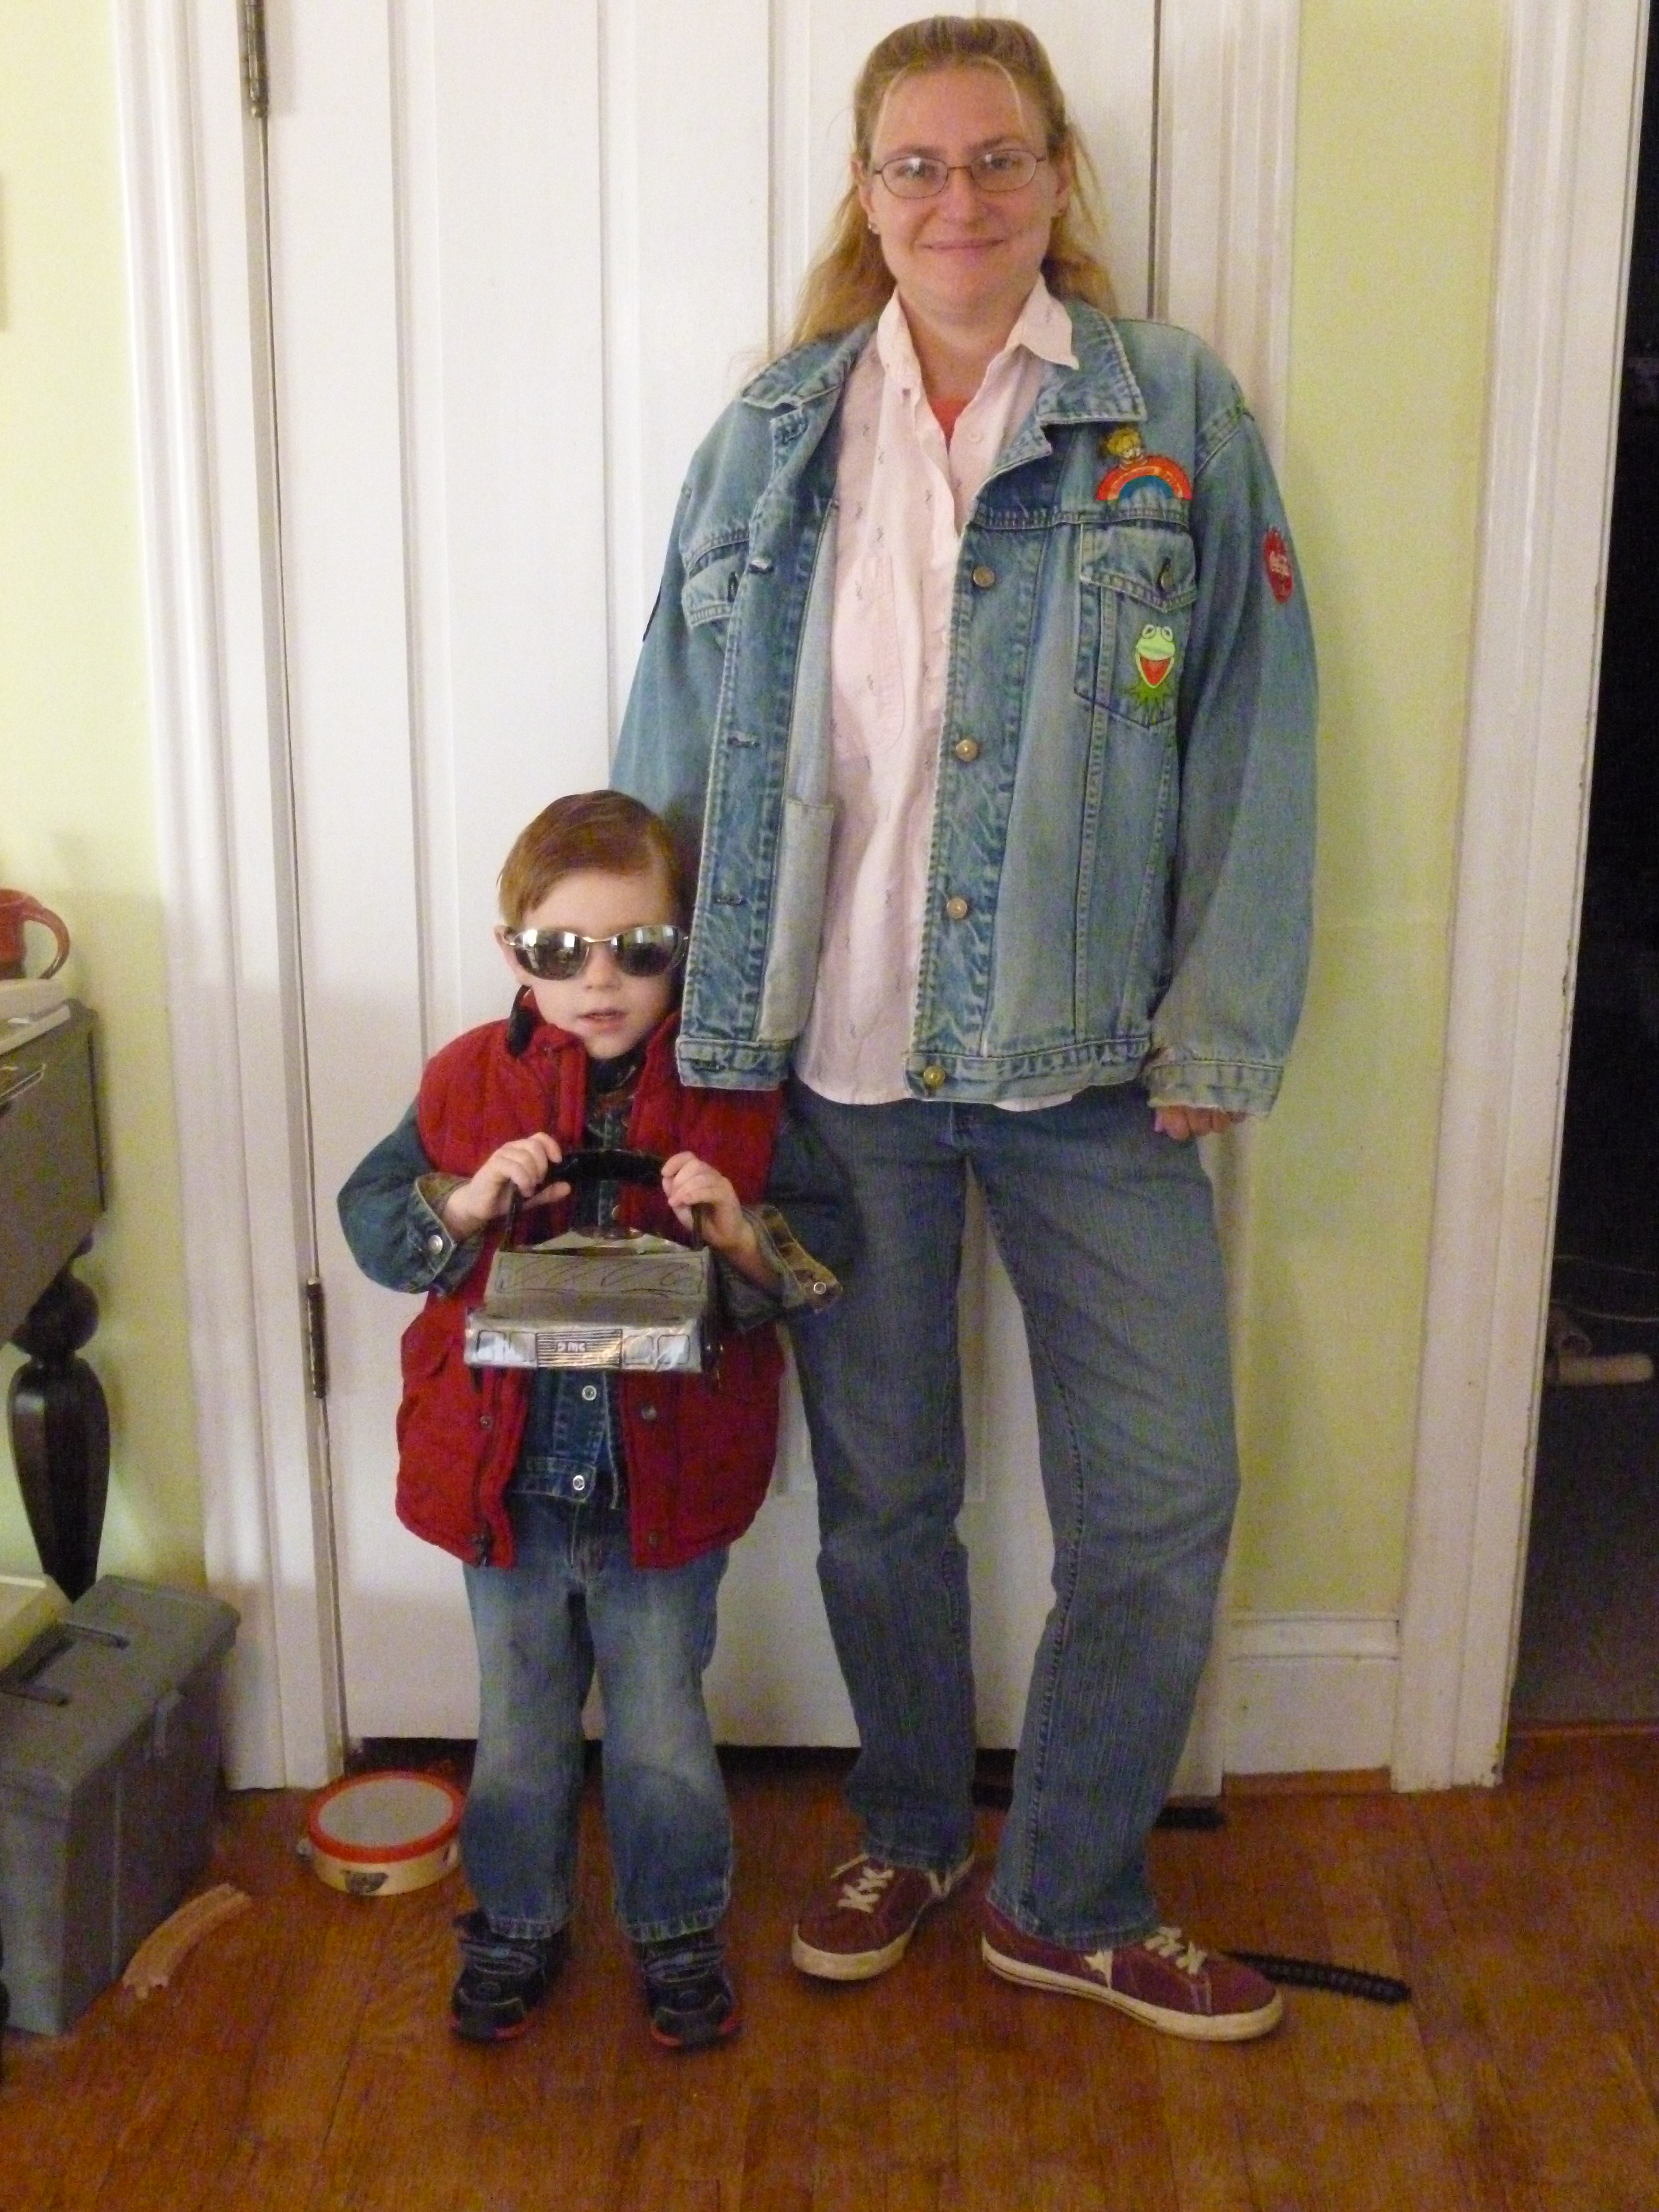
Marty McFly & his girlfriend Jennifer. Anyone even know what her last name is in the movie???

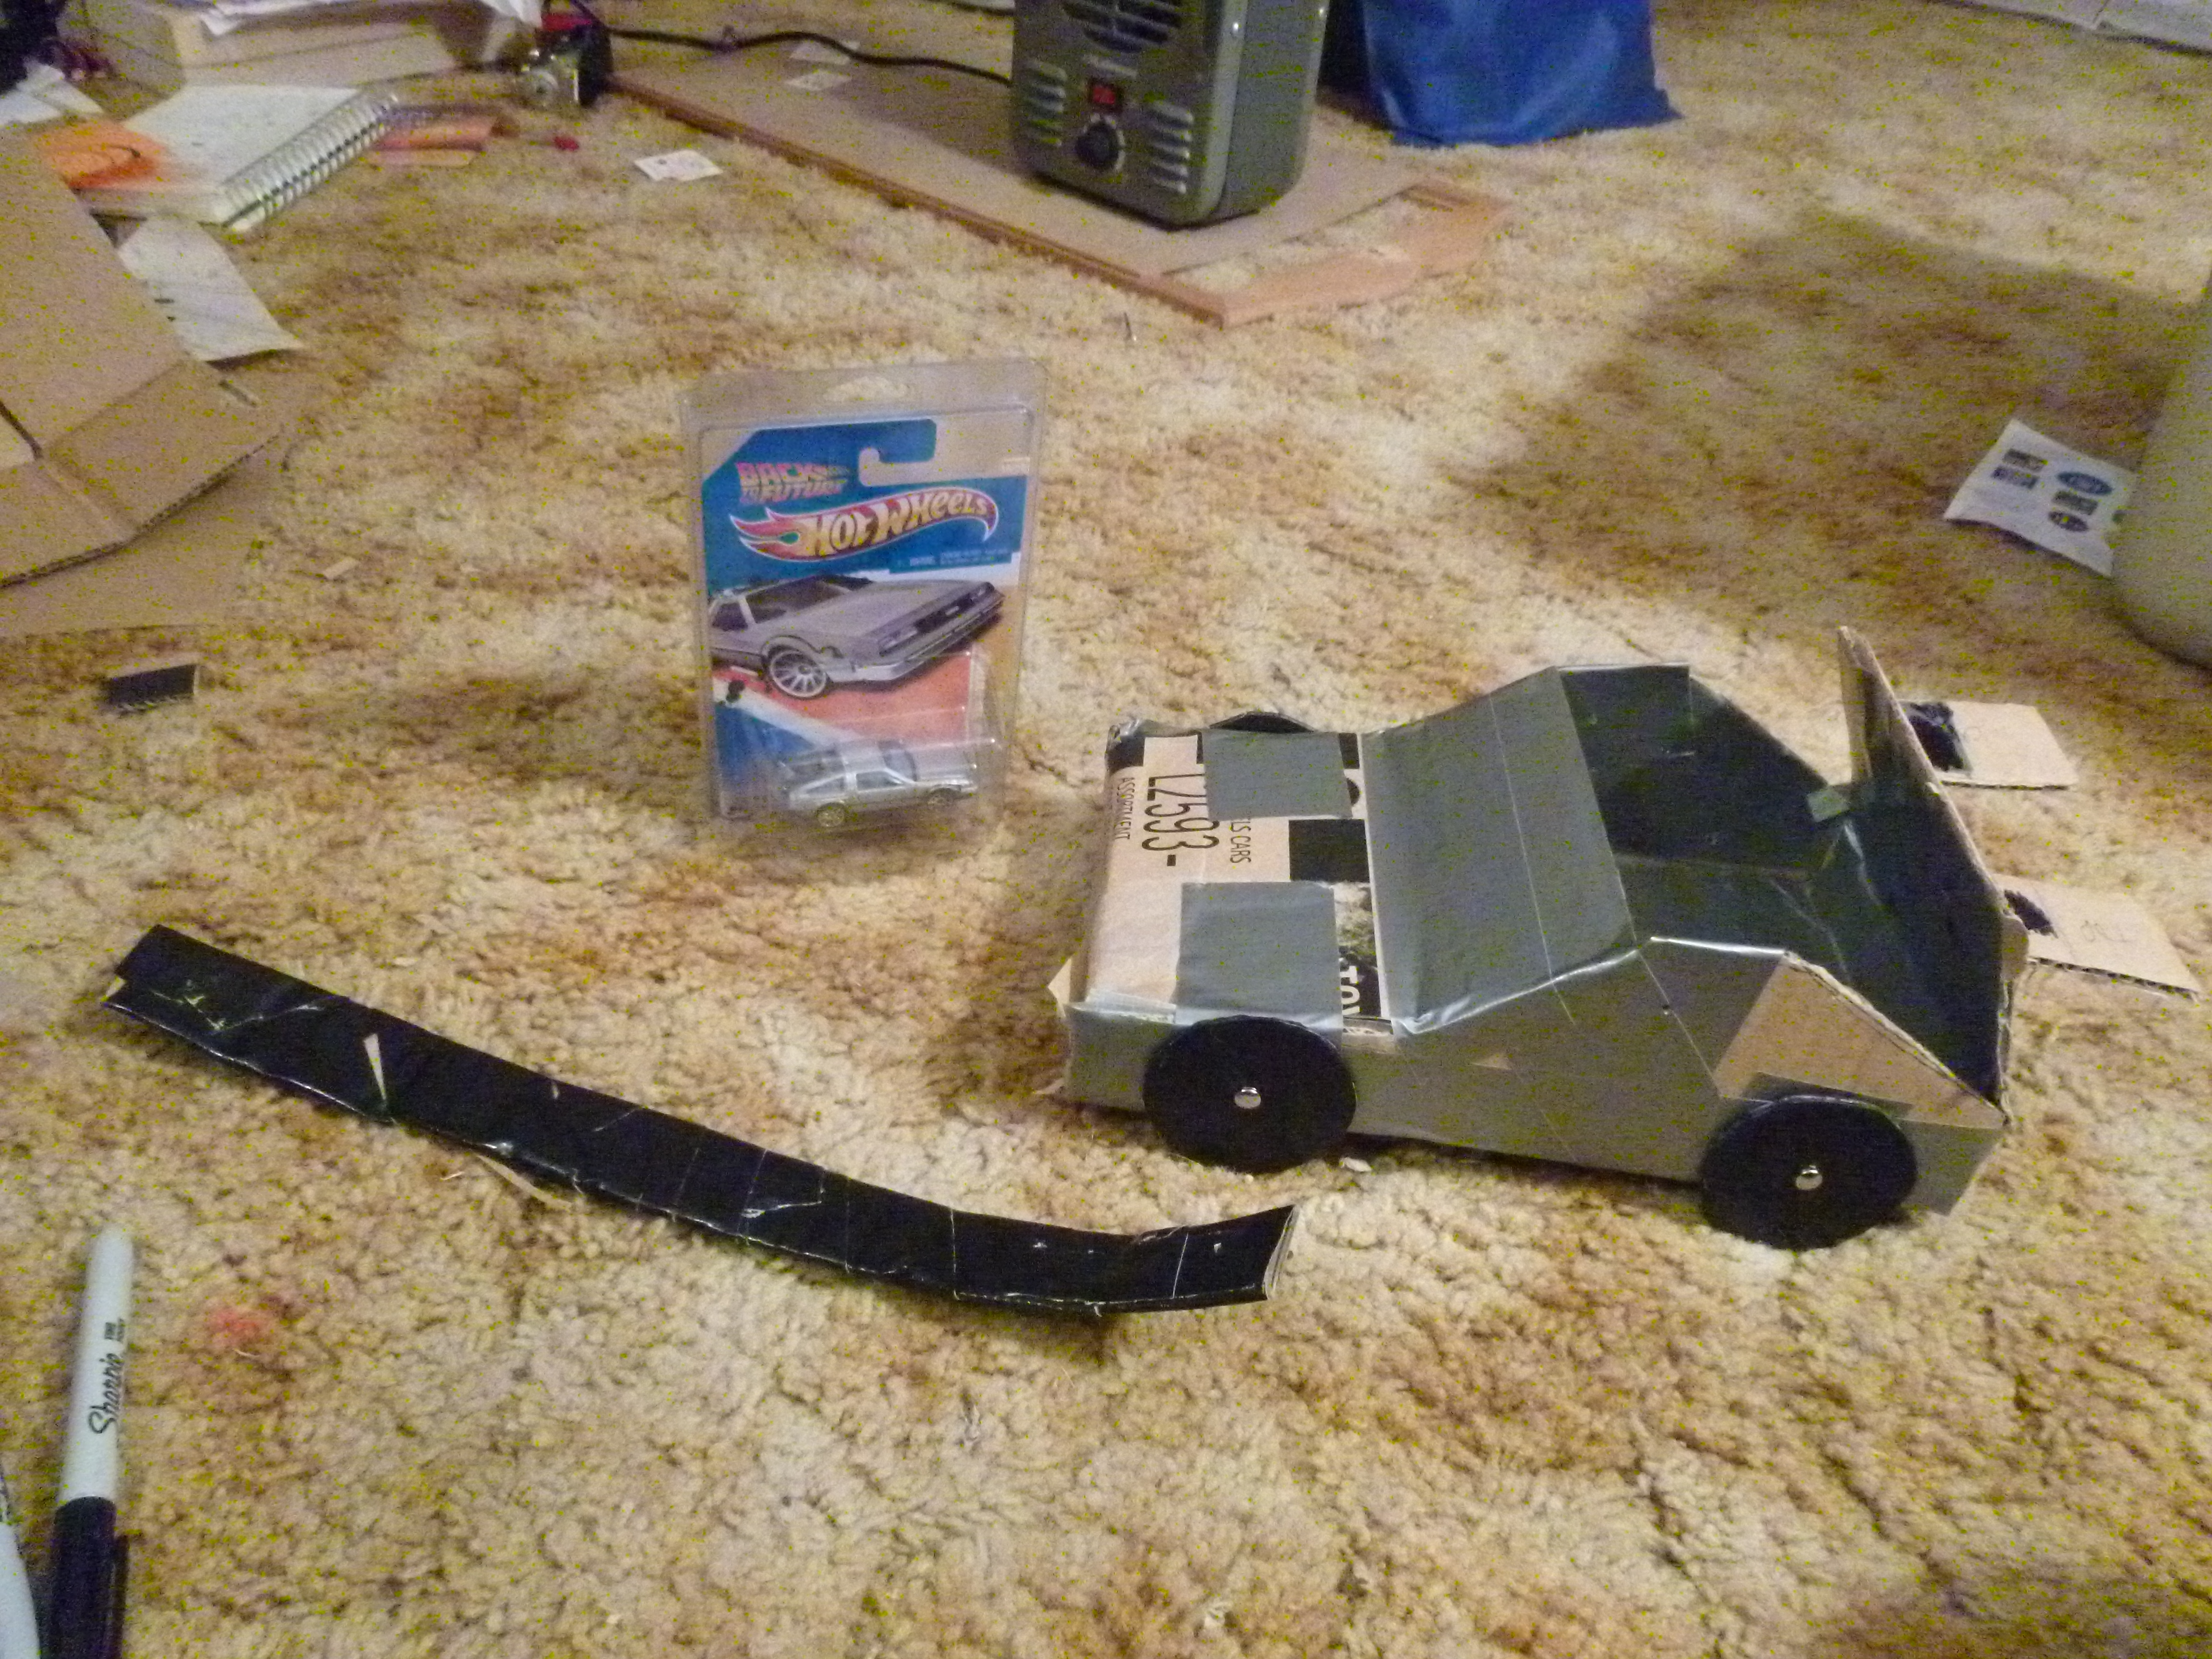
Sometimes, I get these ideas in my had that bang around and won’t go away until I create them. Sometimes it is a mix tape, sometimes a book or a blog post. This time it was an idea to build a DeLeroan treat bucket. It is based off the first DeLorean that Einstein tests, and Marty goes back to 1955 in. Don’t tell me it is missing Mr. Fusion, cuz it ain’t that version!

I will show you the process below. I had no plan from the Internet and no sketches, just the vision in my head. I picked a box that I believed when altered, would be roughly the right shape and size. Incidentally, it started off as a 11″ x 9 1/2″ x 5″ Hot Wheel shipping box. I had to cut down the width, and reattach one of the sides.

Other materials needed:
silver duct tape
black duct tape
black Sharpie marker
silver Sharpie marker
brass fasteners (the longer the prongs, the better)
scrap cardboard
something round for the trunk area (I used a 2 3/4″ Rubbermaid food storage lid)

I duct taped most of the interior first to make it water-resistant, as it tends to rain or snow in our neighborhood on Halloween.

Cut off one side of box, refolded to desired shape.

Cut off one side of box, refolded to desired shape.

Interior taping, removed side about to be reattached.

Interior taping, removed side about to be reattached.

Attach wheels with brass fasteners before entirely taping it together. It is easier that way.

Attach wheels with brass fasteners before entirely taping it together. It is easier that way. Handle lays nearby.

Fully-taped font

Fully-taped front

Fully-taped back. Note the circle, which is actually a Rubbermaid lid.

Fully-taped back. Note the circle, which is actually a Rubbermaid lid.

Handle attached with brass fasteners.

Handle attached with brass fasteners.

Finished side. The tire rims really give it a finished, slick look.

Finished side. The tire rims really give it a finished, slick look.

Finished front. Don't forget the DMC logo!

Finished front. Don’t forget the DMC logo!

Finished rear. I found some details were easier to draw than make.

Finished rear. I found some details were easier to draw than make.

NOTE: My treat bucket is designed for maximum cuteness and a little bit of ruggedness. It will not hold a typical 90 minutes of T-or-T loot. We are planning on taking an additional bag to move the overflow into.

I wanted to post this ahead of Halloween so that people could reference this post for costume and/or DeLorean ideas.

Marty without his coats on.

Marty without his coats on.

Follow the romantic entanglements of The Riley Sisters in my books:
The Wind Could Blow a BugAVAILABLE NOW!
When You Least Expect It NEW RELEASE!
Be Careful What You Wish For – COMING JANUARY 2016!

%d bloggers like this: