RSS Feed

Tag Archives: baking

Real-World Chemistry

Posted on
Just the sight of this textbook scares the crap out of me...

Just the sight of this textbook scares the crap out of me…

To me, when I was in school, we spent a whole lot of time on really boring stuff that had absolutely no application to the real world in which we would some day need to survive in on our own. It might also be why so many people ended up just living in their parent’s basements, working part time jobs to try to pay back student loan debt.

Case in point: The metric system.

We don’t have a meter stick at home, we have a yard stick. My husband goes to the lumber yard for a piece of 6 foot drywall or a 2″x 4″, not 6 meters of drywall. Yet in school, they spent all this time [trying to] teach us the metric system and didn’t teach us the U.S. measurement system that is actually in use in regular lives daily. I still don’t know how many feet or yards are in a mile. I was never taught that in school. Good thing I have it on a ruler from a McDonald’s Happy Meal.

Next point: Balancing a checkbook.

In high school, I took math classes up through Trigonometry. Pretty advanced math. I got mostly A’s and B’s. I didn’t understand any of it. When I went to college, I had to take a test to see if if I would test out of all the math classes. Nope. I ended up taking Algebra a second time. I still don’t understand it.

You know what I also have trouble with? Balancing my checkbook. It has to rank up there are one of THE most important tasks you have to do regularly as an adult. When did they teach that to us in school? Formally, never. Informally, during a Junior Achievement exercise in 7th grade. And my mom taught me.

I never took Chemistry in high school. It was taught by a man who had already failed to teach me Algebra and Drivers Ed, and he made my skin crawl. So why would I waste more time in a class with him with subject matter I was not remotely interested in?

When I got to college, I evaded Chemistry class as well. I took lots of Psychology and English classes instead.

But lately, I can’t get this idea out of my head. It keeps popping up in my day-to-day life.

What if they taught a high school class on Chemistry that kids could relate to? That would interest them? Chemistry is all around us in our daily lives. What if we could understand our normal lives better, and not learn about super-colliders, or whatever?

I had this brainstorm while coloring my hair. How many high school girls (and guys nowadays, I suppose) color their hair? Total chemistry. You have to take the one magic bottle and place it into the other magic bottle. What is in those bottles, exactly? Why do they react to change your hair color? Make your scalp burn? Why will it possibly explode if you recap it after mixing? I would love to know these answers!

The other day my husband and I were at a craft show. We had a long conversation with a lady who had a booth full of homemade soap. My husband expressed that it smelled great, but he was afraid that it would dry out his skin.

She went into a long explanation about how the longer the soap sits after it is made, the pH has more time to change. This causes the soap to be less drying. She sounded super-knowledgeable. I had never heard that stuff before. She could have been making it all up just to make a sale.

But, if there was a Real-World Chemistry class, that would be a GREAT experiment! And all the students could have yummy smelling soap that they made to take home.

My husband loves to make homemade silly putty with a mixture of glue and cornstarch. I don’t understand it myself, but he always has lots of fun. EXPERIMENT for Real-World Chemistry!

Yummm.

Yummm. Cinnamon rolls.

The other day I made cinnamon rolls, the kind my mom used to spend 5 hours making me for my birthday when I was a child (I always loved them more than cake.) The kind that you have to put yeast in, let them rise, beat them down, then let them rise some more. It was frustrating to find just the right amount of heat in my kitchen to make it rise. Then I noticed the recipe at one point said the dough should be “elastic and smooth”. Low and behold, over the past several hours and kneading, it had changed to just that. But how?

I find this topic very frustrating. Kids should at least know the basics of the world around them. Isn’t there always a big drive to get girls more interested in science?

HERE IS YOUR ANSWER!

And boys would take the class, thinking it would be an easy A, then accidentally learn something.

I don’t want other kids to avoid the subject altogether as I did. Now I can’t answer clues on Jeopardy. And I don’t understand joke T-shirts and throw pillows with periodic elements on them 😦

Periodic Table T-shirt

Periodic Table T-shirt. Is it funny? I can’t tell!

Periodic table throw pillow

Periodic table throw pillow. Is it a statement about science or texting? Or both!

My first book, The Wind Could Blow a Bug is NOW AVAILABLE!

PURCHASE as a Paperback or eBook on Amazon.com TODAY.

Caboose Cake

Last year I made my son, M, a rather complex Thomas the Tank Engine cake for his birthday. You can get more info and instruction for Thomas here: https://imnotstalkingyou.com/2012/11/27/beginners-luck-the-post-with-the-thomas-cake/

My finished Thomas The Tank Engine cake

My finished Thomas The Tank Engine cake

I did a month of preparation for it (planning, shopping, baking, freezing, studying Cake Boss episodes). My son still remembers the cake because pictures of it keep circulating on my digital picture frame.

I started asking him a couple of months ago what kind of cake he wanted this year. First he told me “a Creeper cake” (from Scooby-Doo).

The Creeper from Scooby-Doo

The Creeper from Scooby-Doo

I told him no. Beyond my skill level and too scary.

Then he fell in love with the story “The Little Red Caboose” by Marian Potter. Then all he wanted was a caboose cake. Last year was the beginning of the train, this year the end. A caboose is pretty much a rectangle. I could handle that.

My inspiration: The Little Red Caboose by Marian Potter

My inspiration: The Little Red Caboose by Marian Potter

I had two goals with this cake, which greatly affected the outcome:

1. Make it taste better than the Thomas cake.

Thomas was all about the looks. I used fondant and butter cream frosting to make him look awesome. I wasn’t crazy about the taste of either of them. This year I vowed to use regular old in-the-can Duncan Hines frosting, no matter what the impact on my finished creation would be.

Thomas was made with two boxes of cake mix. The caboose is only made from one box. I used yummy strawberry cake and layered it with chocolate frosting. I covered the outside with colored vanilla frosting.

2. Do not be stressed out.

Well, I was a little. I only had like 2 1/2 hours to assemble the cake on the morning of my son’s birthday. But that was only like one day’s worth of stress compared to last year’s weeks worth of so much anxiety I couldn’t sleep. When I made the Thomas cake, I wasn’t working. I had plenty of time to plan cakes and worry last year. Not so much this year.

So, when you judge the result of my efforts, take those two things into consideration.

I present to you, my caboose cake!

My Caboose Cake!

My Caboose Cake!

It could put a diabetic in a coma!

It is complete with smoke stack, buffers, and a brake wheel (the brake wheel is important in the story).

It…looks a little like a houseboat???

I was way too far into my hasty assembly and decorating before I realized that I had forgotten to make another lower level for the back.

But look at the fine details of the railing! The door! The windows!

I think I should at least get credit for trying. My asbestos friend said she would not even attempt such a thing. (Which is silly, because I have seen her make an adorable Stitch costume in one night. Creativity flows from one medium to another. Except music. I can’t make music to save my life.)

The ultimate test for me is if my son can tell what the cake is supposed to be. And he could!

Then he pointed out that there were only buffers on on end. And he wanted me to make the rest of the train cars :/

I pretty much used the knowledge I gained from Thomas to make this cake.

1. Draw picture.

Rough drawing  (Click on any picture to make it larger)

Rough drawing (Click on any picture to make it larger)

2. I used paper to create a template.

3. I baked and froze my cakes, wrapping them in wax paper and foil to prevent freezer burn. I used one box of cake mix and split it between 2 loaf pans. Note to Self: Level the cakes at this step next time.

Frozen cakes

Frozen cakes

4. I took them out of the freezer and cut them according to the templates.

Frozen cakes with templates

Frozen cakes with templates

5. I stacked them using frosting. (This is where I should have consulted my original drawing again. Whoops. You know what they say: Live and learn and eat a houseboat.) I slid two wooden dowels through the high part.

Stacked cakes with dowels

Stacked cakes with dowels

6. Frosted the outside.

Covered in red frosting

Covered in red frosting

7. Applied decorations. I used Hershey’s kisses for the wheels, fruit roll-ups for the windows, cinnamon discs for the lights, Rice Krispie treats for the back end, and a huge-ass Hershey bar for the roof. Most of the rest of the details are made out of licorice. Which you could not pay me to eat, but it proved to be a very versatile decorating tool. The railing was made with the help of paper sucker sticks and toothpicks (DO NOT EAT TOOTHPICKS!).

Constructing caboose details

Constructing caboose details

8. I used chocolate frosting for the ground, brown sugar for the gravel/dirt, and licorice for the rails and ties. I wanted to have green frosting for grass, but I forgot and dyed all my frosting red.

*Moral of the story: Take your time! Do not rush!

Cake showing all details and tracks

Cake showing all details and tracks

9. Apply dinosaur candles to instantly convert the caboose into one of my son’s other favorite entertainment franchises: Dinosaur Train!

Caboose with dinosaur candles inserted

Caboose with dinosaur candles inserted

10. Light candles.

CABOOSE-11

11. Make wish.

12. Blow out flame.

13. Cut cake, removing all non-edible objects.

14. EAT!

Destruction: The tastiest part of cake-baking

Destruction: The tastiest part of cake-baking

15. Re-light candles. Make more wishes.

Remember what my Thomas Cake post was titled?

“Beginner’s Luck”

Yep. This is what happens when beginner’s luck runs out.

The dashing birthday boy!

The dashing birthday boy!

Beginner’s Luck (The Post With The Thomas Cake)

I have beginner’s luck. I may have first realized this while bowling.

I make it a policy never to throw warm-up balls when I bowl, because all the throws after that will be worse. So I save those for my first few frames that count. It works every time. I always have a better score in my first game, than any game that follows.

My son turned two recently. We were to have a Thomas & Friends-themed party. I was counting on this to be the case with cake-making as well. I think I assumed correctly.

I have never made a layered, sculpted, shaped, character cake or used fondant before. May I present to you, the most elaborate birthday cake I have ever made in my life.

My finished Thomas The Tank Engine cake

Once I came up with this idea in my head, I just knew that a flat sheet cake with a Thomas picture or toy on it just wasn’t going to do. I must give credit where it is due. I would never have attempted this if I had not found a great Thomas tutorial online by Wendy Lindsey at http://thomasthetankenginecake.blogspot.com/ .

I did make some deviations from her directions, mostly due to budget constraints. Then I was dead-set on using fondant, so I probably spent any money I saved on that:P

This is what I used for my recipe:

2 boxes of Duncan Hines yellow cake mix
2-3 boxes of Wilton Buttercream Icing Mix (more on this later)
2 boxes (24 oz each) Wilton Rolled Fondant, pastel blue
2 dowels
1 8″ lollipop stick
1 very strong cake board or several weaker ones bound together
wax paper
aluminum foil
fondant shaper
food coloring in yellow, black, and red
clay shaping tools
small paintbrush
toothpicks
Crisco
powdered sugar
rolling pin
1970’s aluminum cake decorator w/tips (feel free to substitute piping bags and tips)

I highly recommend if you are going to make this cake to study Wendy’s 14 pages of highly detailed directions and tips. What follows is my experience and deviations from her great work!  All measurements given in inches. (Click any picture to see it larger.)

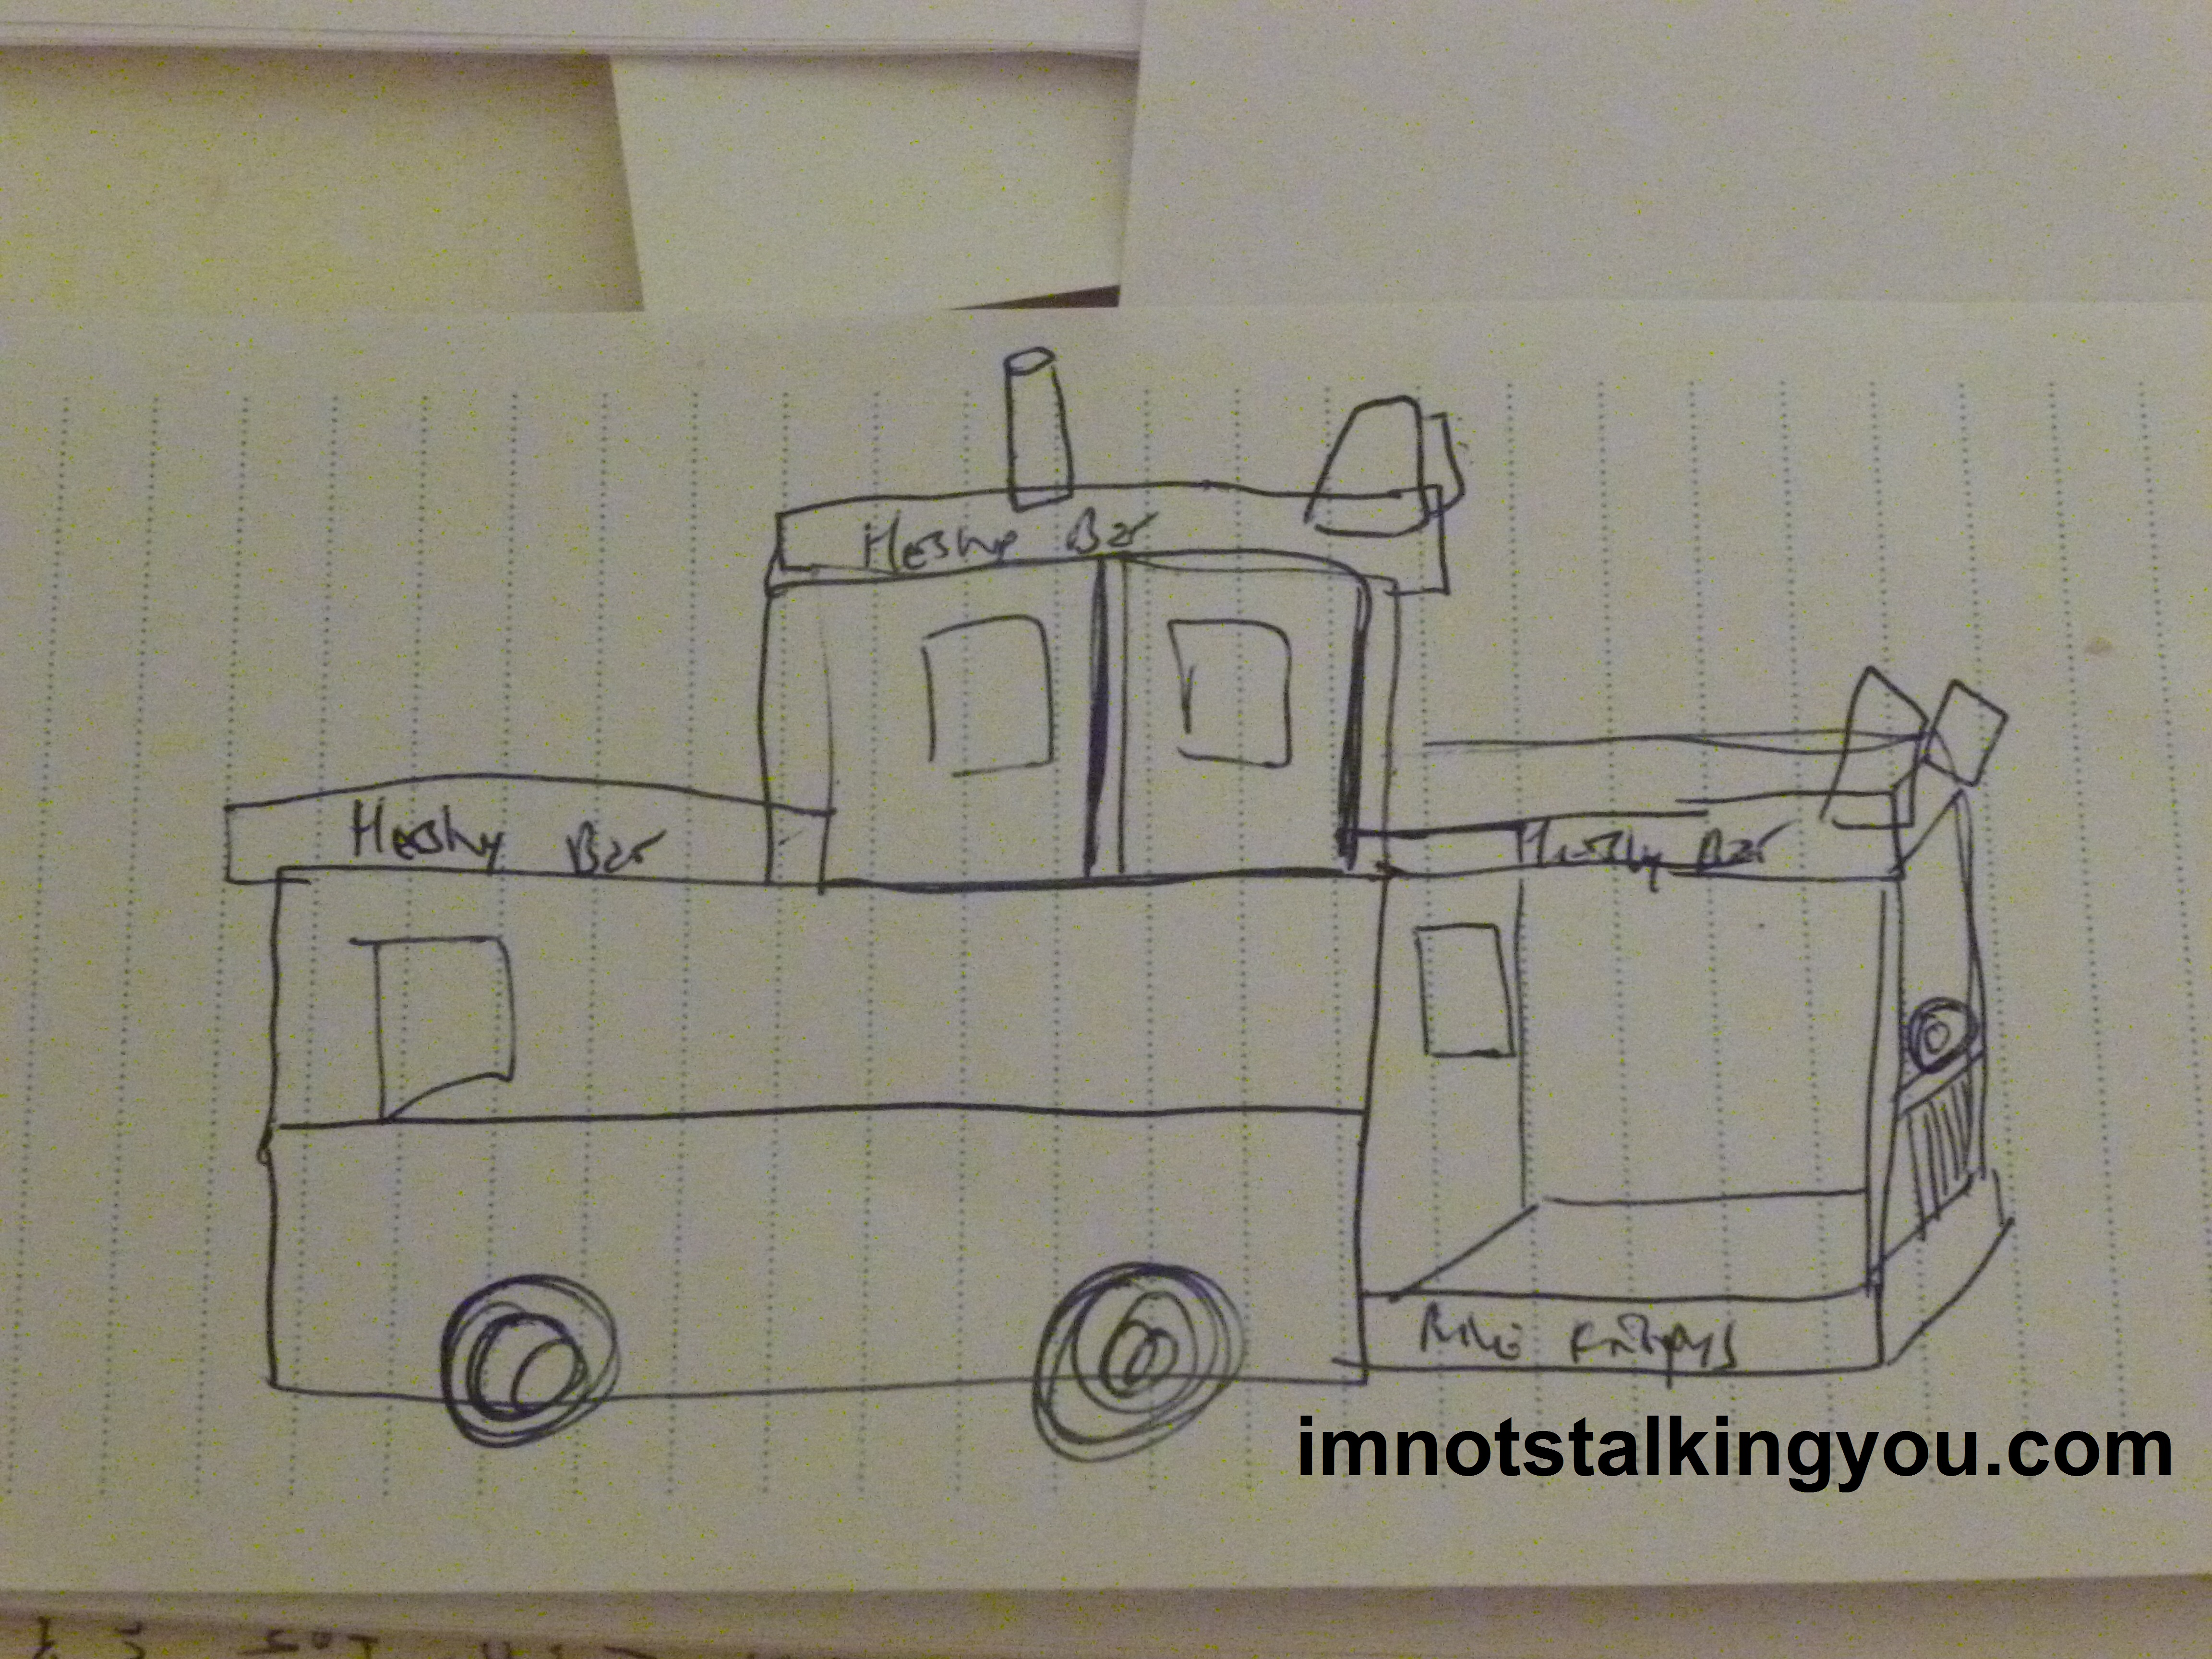
The picture I used for the face and the toys I used for the body

This is what I based my cake off of. Thomas is a little different in every toy, so that can drive a person nuts.

This is Thomas’ face made out of fondant. Make it at least 4 days ahead of time so it has time to dry.

First I made Thomas’ face out of fondant. I didn’t want to have to color my fondant to be blue later (which would have been impossible anyway), so I only purchased blue fondant. I knew that after adding black, the face would look gray and not blue. I was sure to put the stick in before the face dried. Because I was being cheap and didn’t buy any white fondant, I finished the eyes, mouth, and pupils later with buttercream icing. I made the face on Tuesday for a Saturday party.

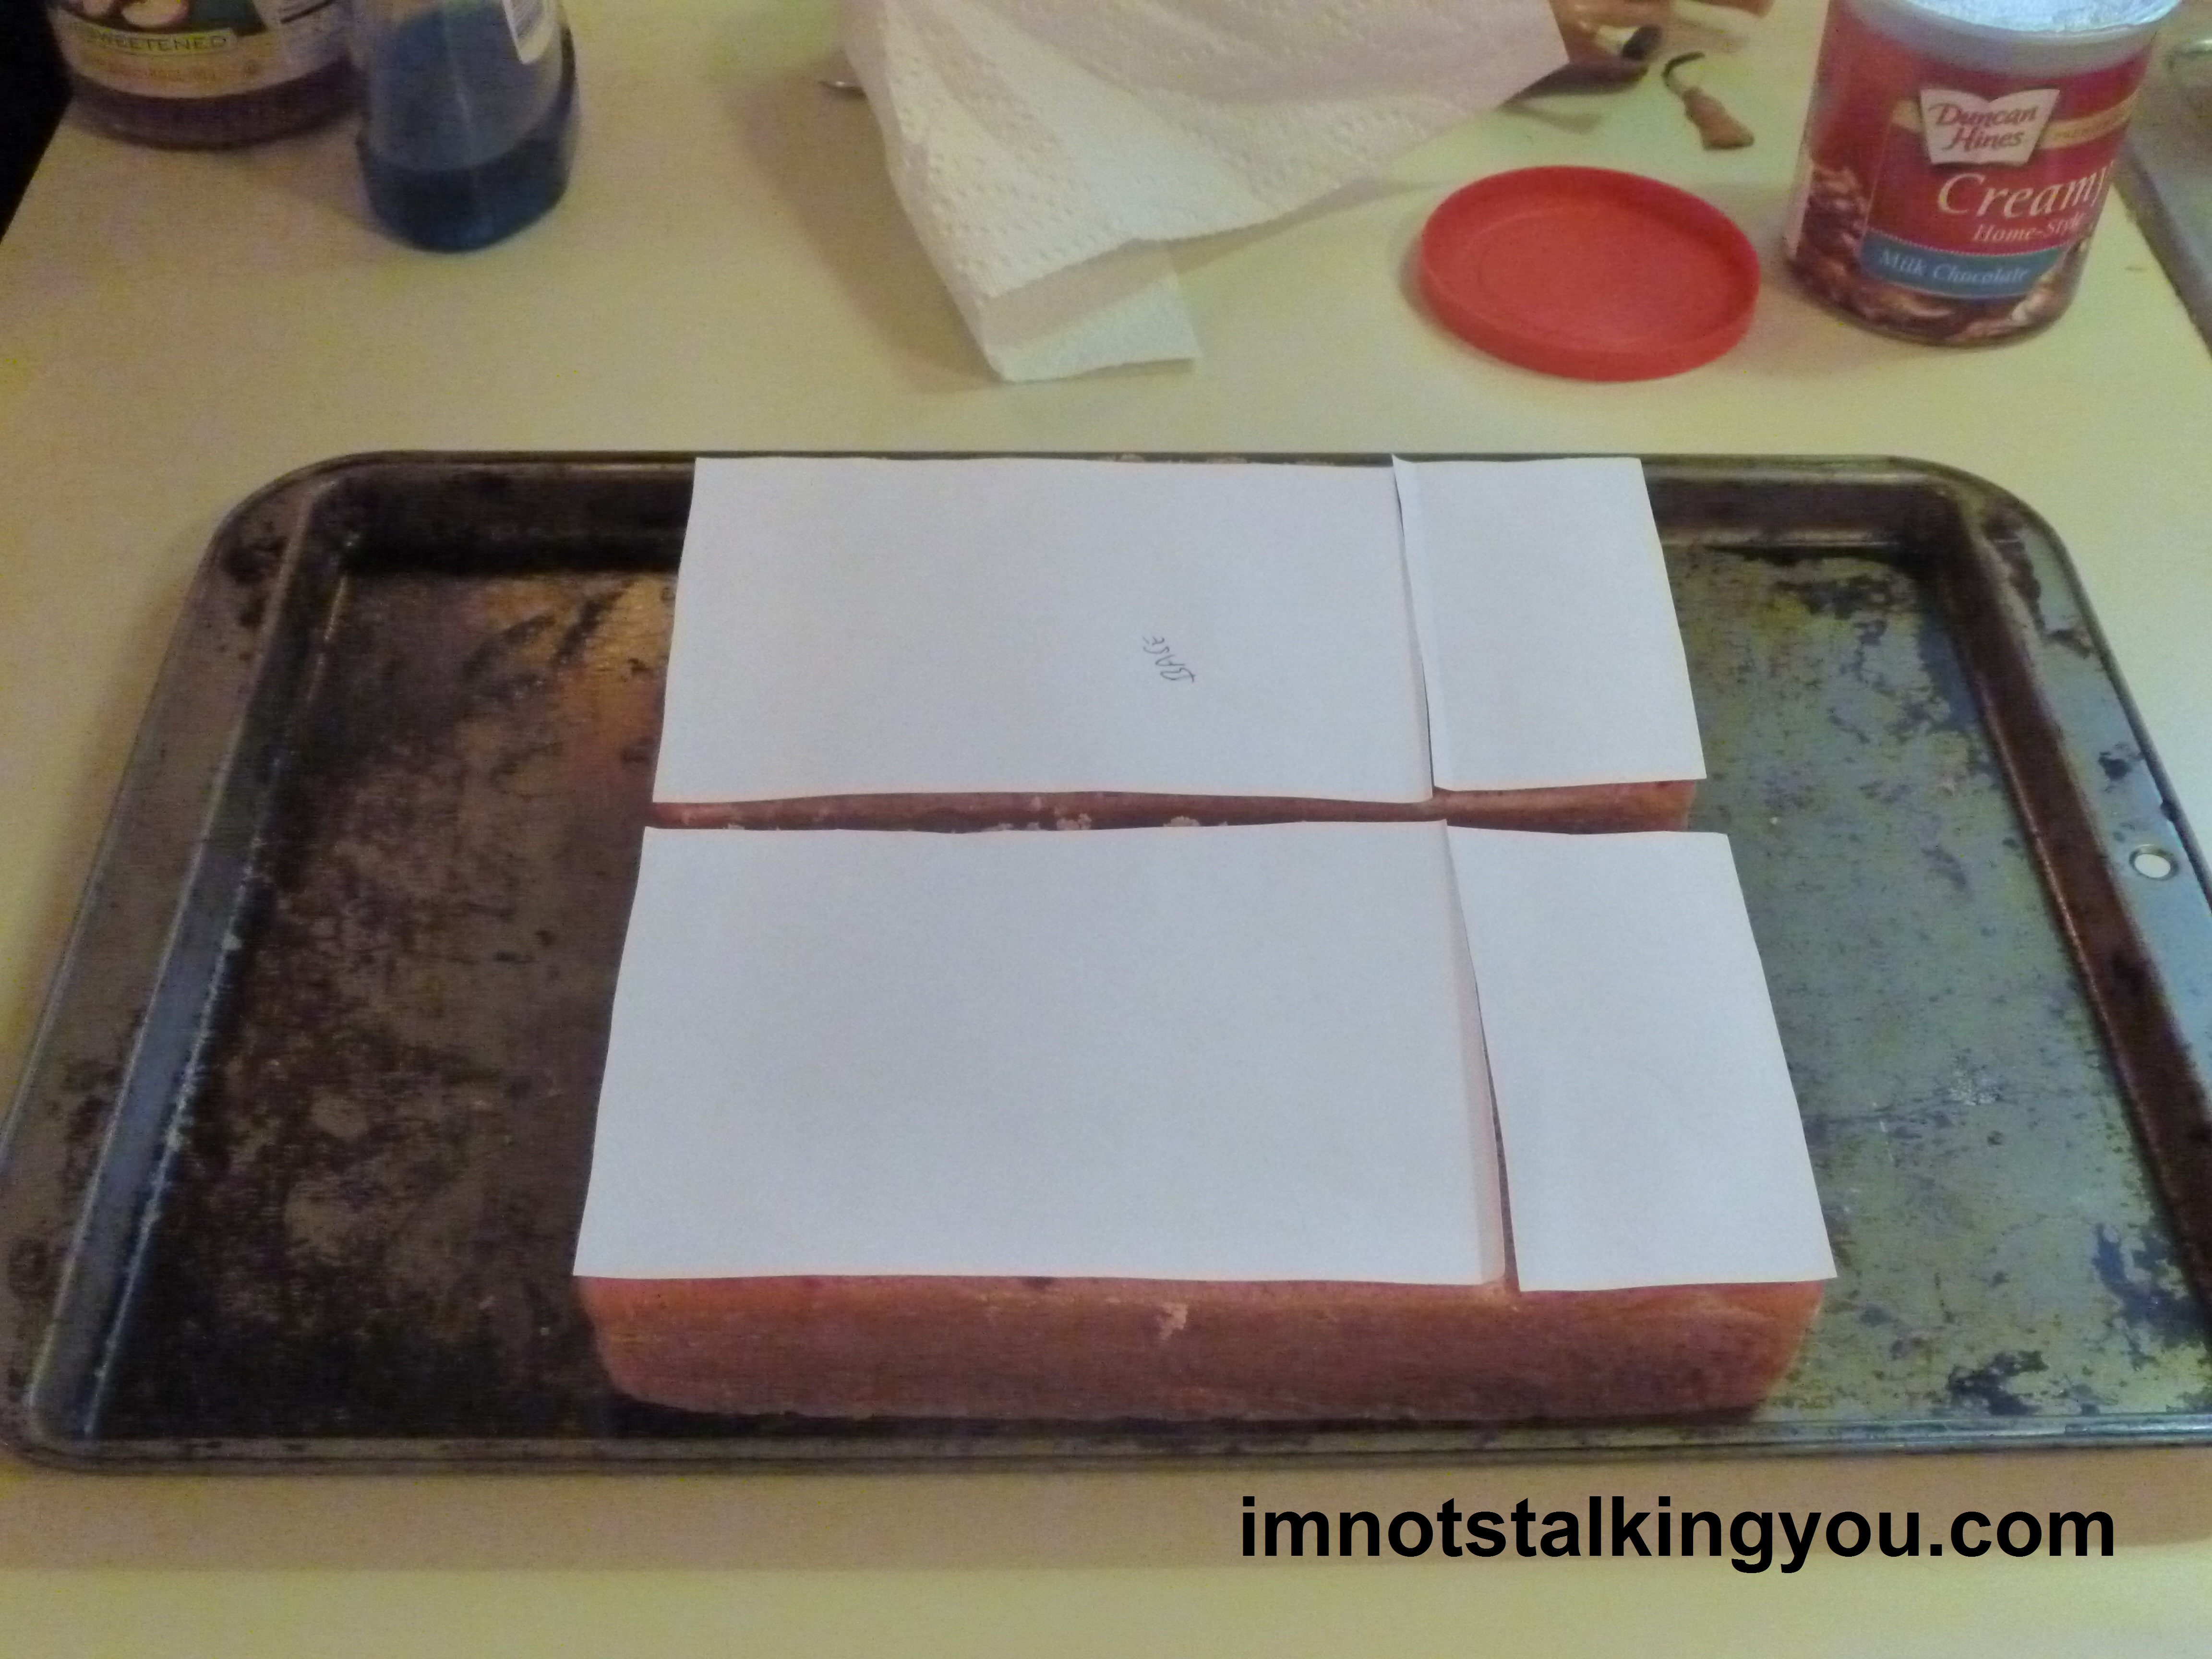
9″X13″ metal cake pan with paper pattern

9″X13″ glass pan with paper patterns

I don’t have a sheet cake pan, so I baked two 9″X13″ cakes. I created paper patterns ahead of time to visualize how I would stack my four layers. I used these patterns to score the cakes before I put them into the freezer, wrapping them in wax paper, then covering with several layers of foil. I baked and froze the cakes on Wednesday for a Saturday party.

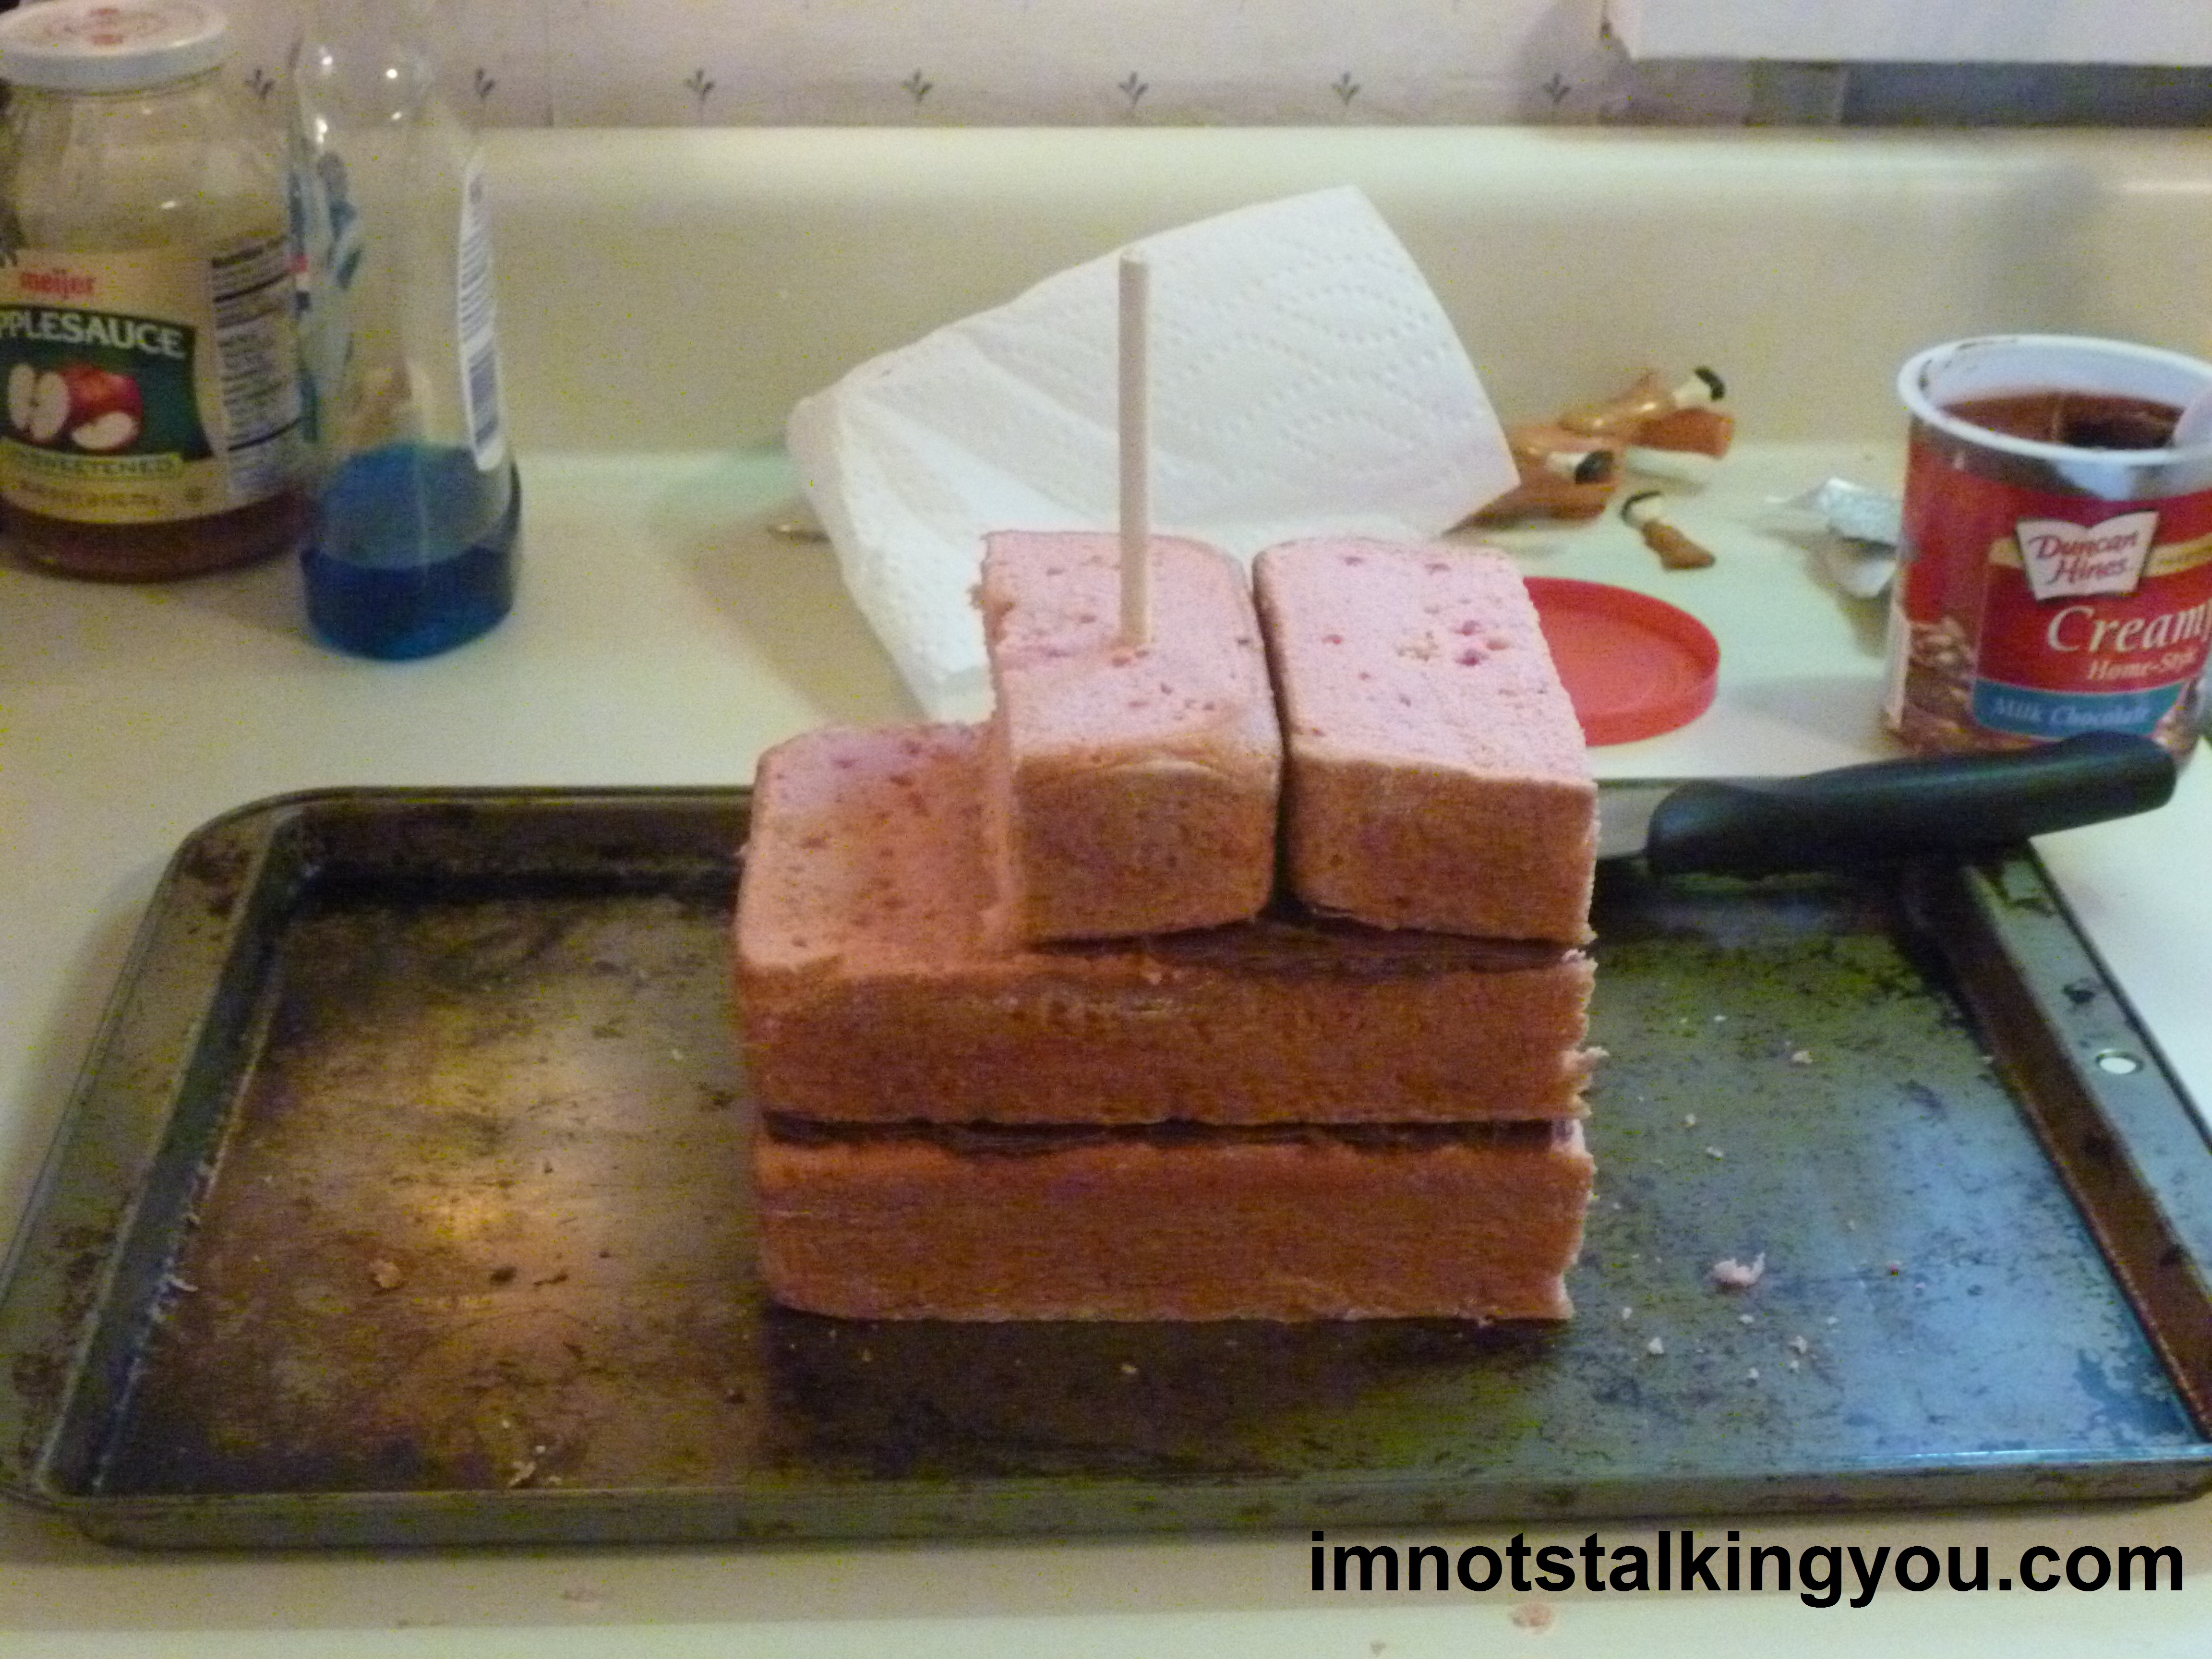
Assembling the frozen cake

On Friday, I prepped my cake board. I taped three 14″X14″ boards together, covering the top with wax paper for easy removal of stray frosting and crumbs later. I lined the edge with blue electrical tape because, well, that is what I had in the house.

Here you can see that the third layer is actually made of two long pieces

Then I removed the frozen cakes from the freezer and assembled them according to my pattern. Using two 9″X13″ cakes did not leave me very many scraps to work with. But you will see I did have enough to make a funnel and steam dome. These are fragile, small pieces. Note that I made my third layer out of two long pieces of cake. It would have been more stable if that layer had all been one piece.

My kitchen floor slants downhill, therefore my oven does as well.  I was too cheap to buy a cake leveler, but now I see that a cake that is more level will yield a better result (and be easier to stack).

Crumb coating

Then I covered the whole cake with the buttercream icing, to form a crumb coat.

After days of watching Cake Boss to try to figure out what the f*** to do with fondant, I attempted to cover my cake. I have never used fondant before. I have never eaten fondant before. I have never even seen it used IN PERSON before. Frosting would have been more cost effective and perfectly acceptable. But in my head my Thomas had a smooth finish I knew I could never achieve with icing.

I used Wilton pre-made rolled fondant. I have no idea if it was good or not because Wilton codes their expiration dates. (If someone knows the decoding secret, please let me know. Thanks.) I bought them at Hobby Lobby. Never having used fondant before, I have no idea if it was the right consistency, but it seemed very stiff to me and I didn’t know what to add to fix that. At this point I was glad I bought the fondant pre-colored, as there is no way I could have kneaded it enough to have ever added my own color. I almost sprained something trying to roll it out with the rolling pin. Even then, it was still a little thicker than the 1/4″ inch thickness it was supposed to be. I wished I had one of those rolling machines that the Cake Boss uses.

Because the fondant was so thick, it cracked when I put it on my cake. A LOT. I made many patches using Crisco and powdered sugar and additional fondant, which actually turned out REALLY well. I was afraid of losing my funnel and steam dome putting on the fondant. If you just frosted a cake, I don’t think they would cause any problem. If I had modeling chocolate like the Cake Boss, I think that would have been a better solution for my fondant-covered cake.

And here is the result…

Fondant covered cake. After it set up for a few hours, I used a paint brush to dust off the excess powdered sugar.

It wasn’t as smooth as the Cake Boss, but I think damn good for a first try!

At this point it was late and I was tired. I was unsure then (and still am unsure) what I was supposed to do with the cake once it was covered in fondant. I put it in the fridge uncovered overnight, and then took it out in the morning to finish the decorating. (If that was wrong, someone let me know.)

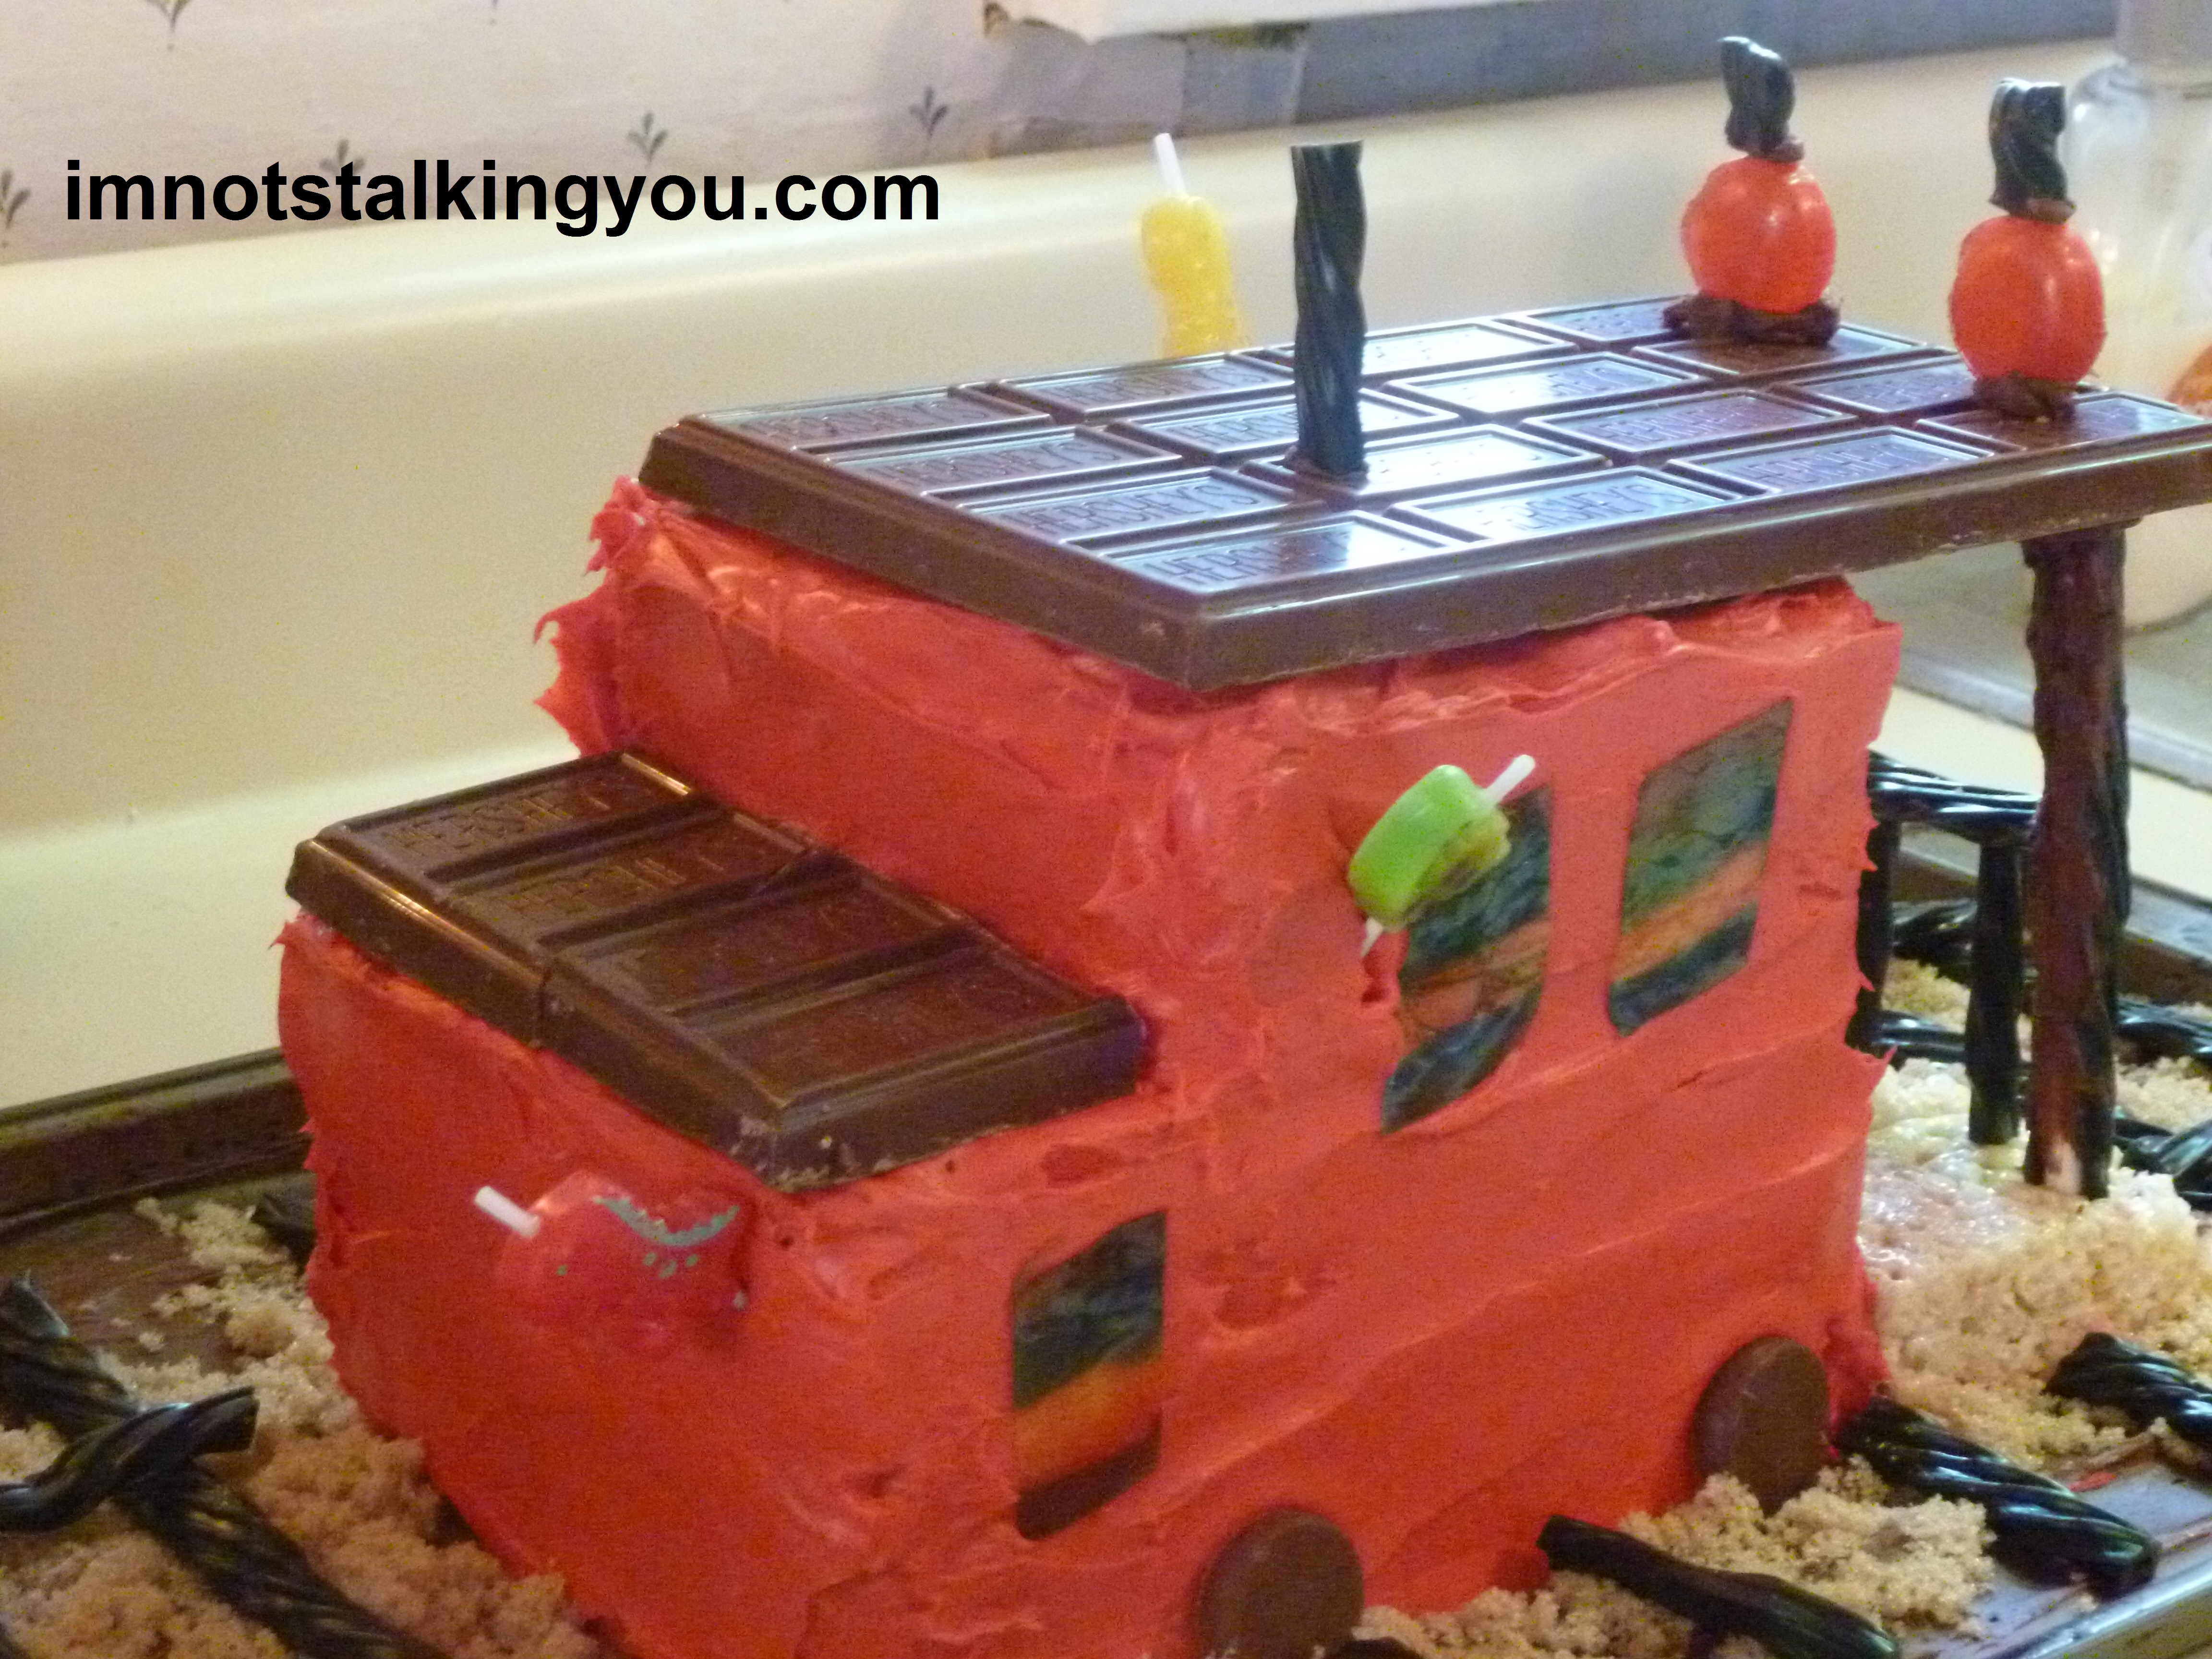
Side details with colored buttercream icing

This is where I was glad that I had an extra box of buttercream icing mix. I probably could have gotten by with only using two, but one of them I mixed too thin, and there is no way I could have used it for the fine detail of decorating. (And be sure to leave out your margarine or butter to soften ahead of time! That almost bit me in the ass at the last minute.)

I just decided what details were important to me to include and which weren’t. I actually put in more than I had planned. Being budget conscious and lazy, I also tried to control the amount of colors I needed to use. I only decorated with black, red, and yellow. The wheels on the toys I have are actually blue, but I liked the ones on the cake as black (and I didn’t have to mix up any blue!).

I was too cheap to buy piping bags & tips, so I used my mom’s ancient aluminum cake decorating kit that I last saw her use in 1982.  The frosting holding part of the tool blocked my vision sometimes, so that is why some details are a little messy.  (Yes, that is my excuse.)

The face, with white and black buttercream icing added

Here is the face, with the eyes, eyebrows and mouth filled in with icing. The face really does make the cake. Mine almost came out too big, so that should be a caution to the next person who tries to make this. When the lollipop stick got trimmed, it got cut too short. It is important that the bottom of the lollipop stick touch the cake board, so that it can support the weight of the face. (I didn’t fully understand this until I reached this step.) I ended up cutting another small piece of stick and taping it to the too short face stick with white electrical tape. (I LOVE electrical tape!)

I was afraid to put the face on because I thought the weight of it would make it fall forward into the red frosting. I didn’t buy any piping gel (which I was supposed to use to stick on the face), so I just used buttercream frosting instead. It stayed on just fine!
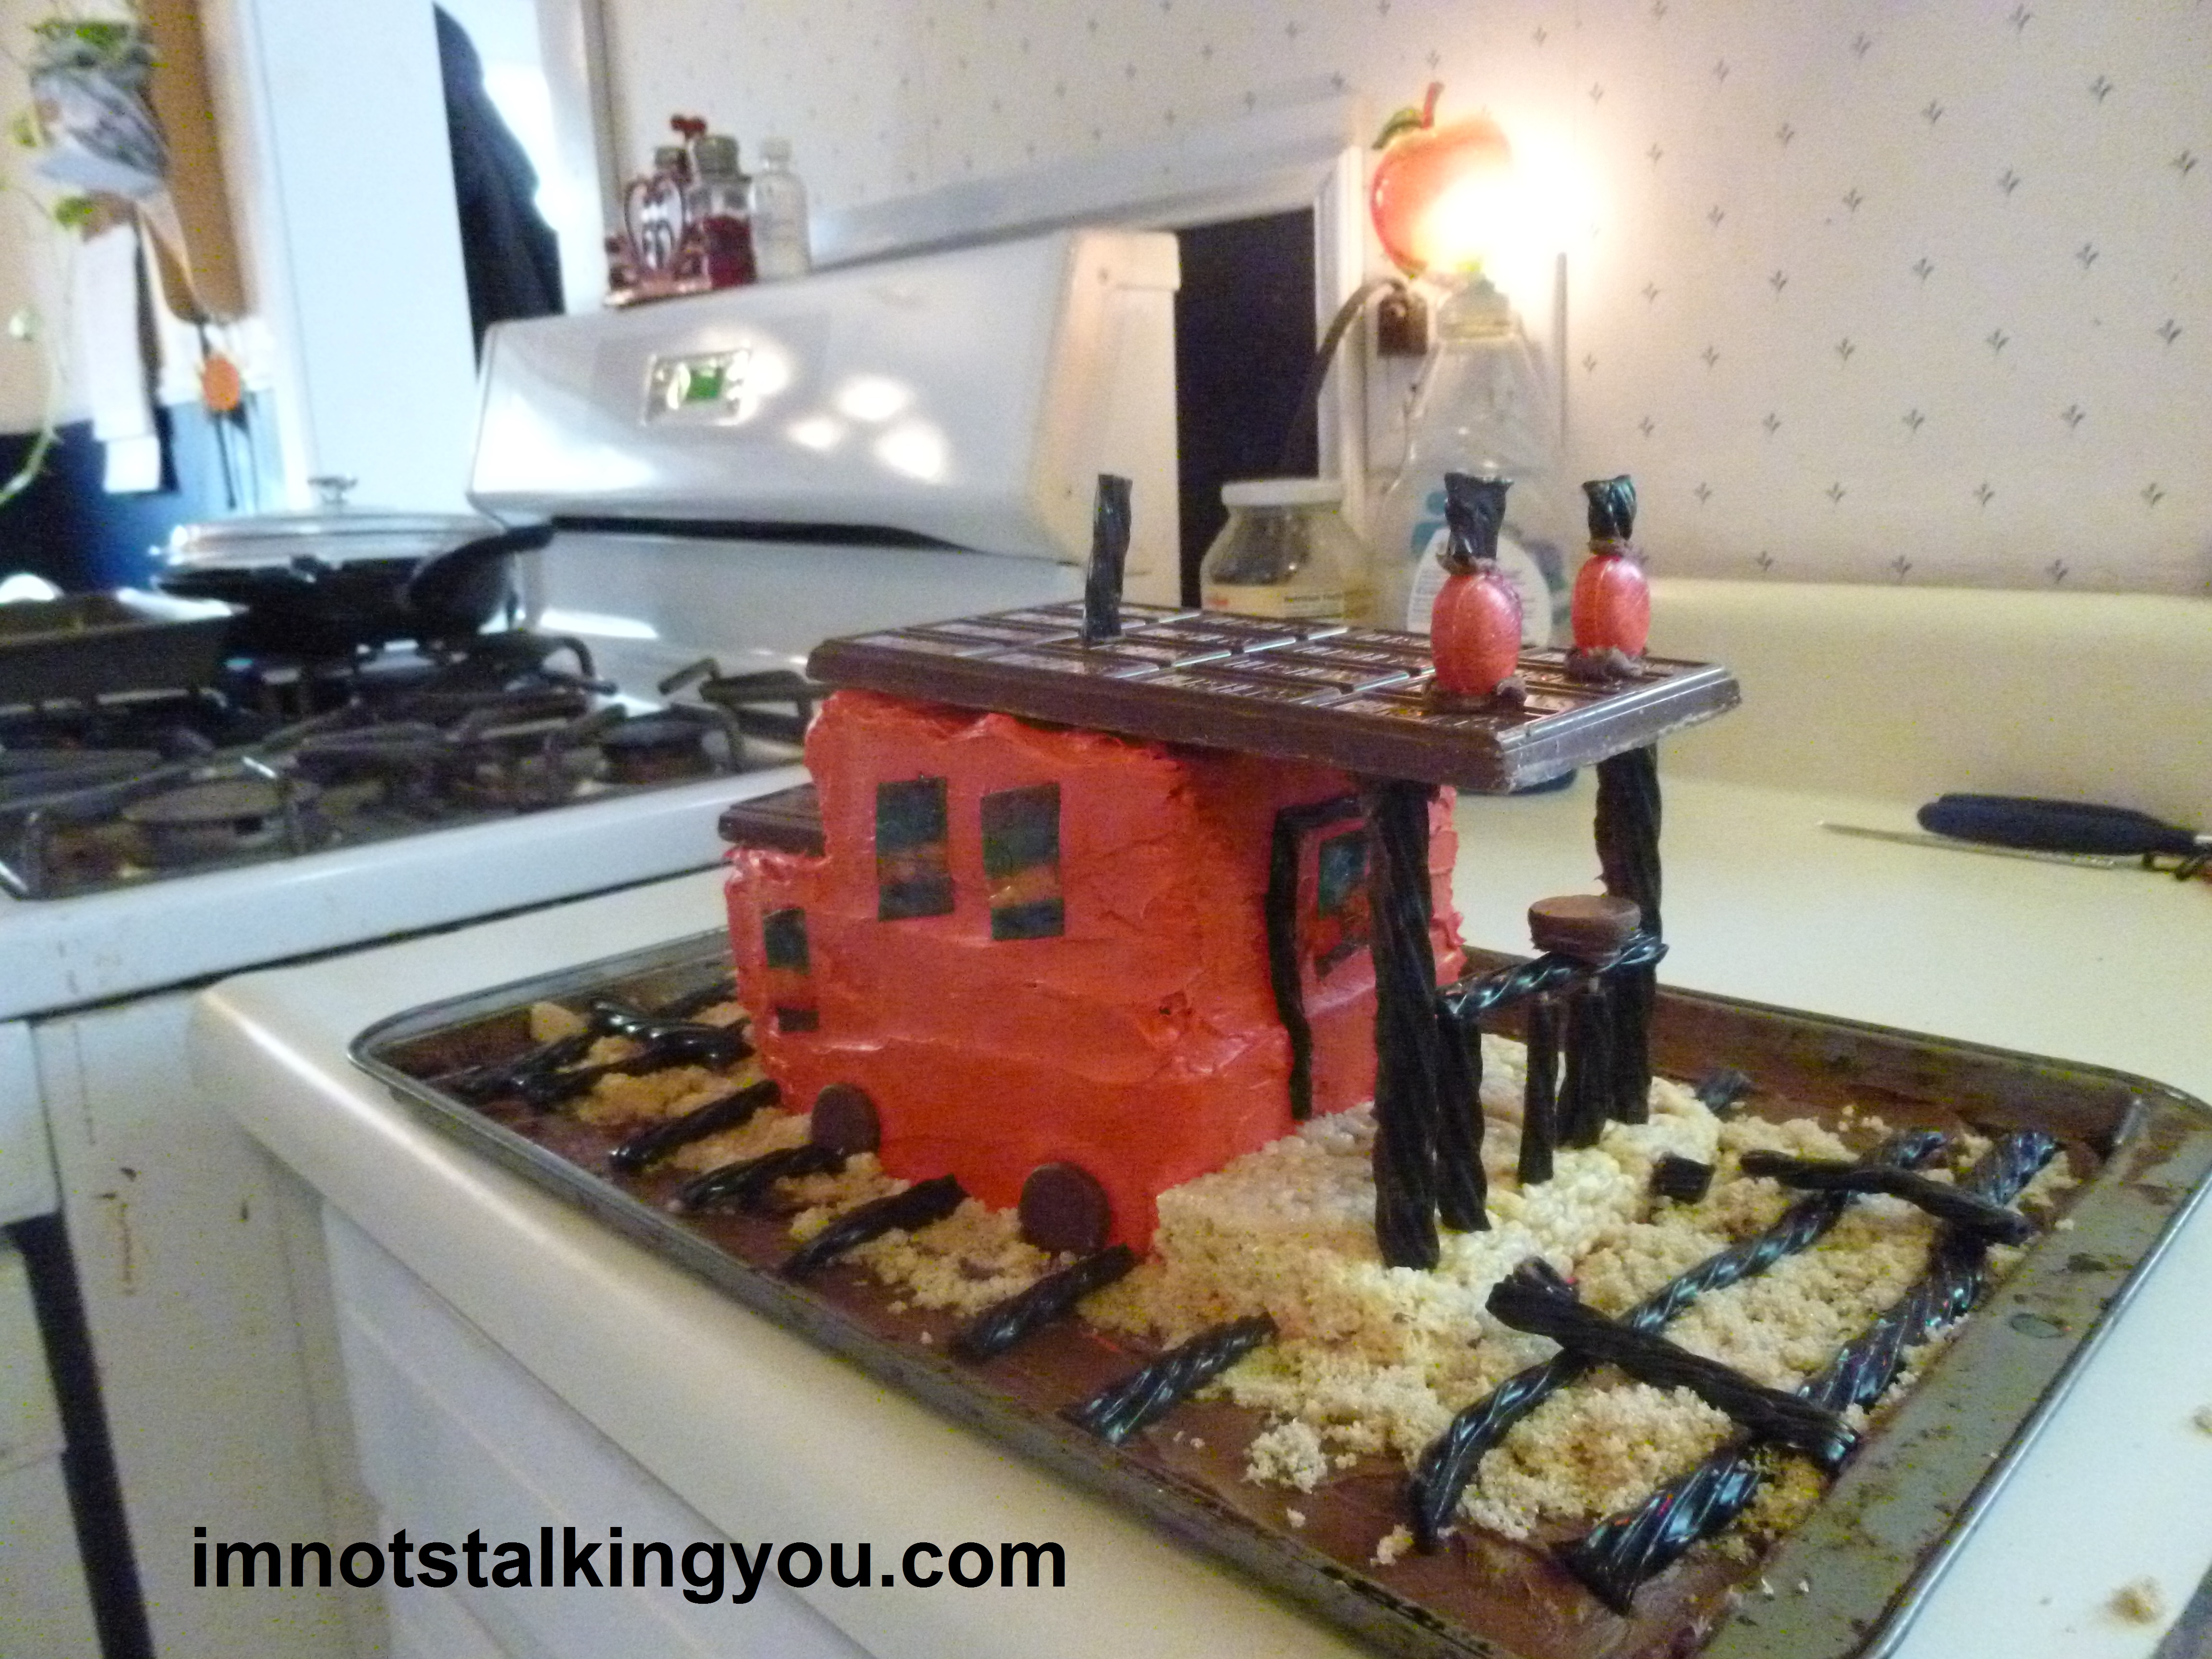
Top view

Back view showing the roof, the coal, and the rear light

Here is the finished cake. It ended up being approximately 10.5″ long by 5″ wide by 6″ tall. The face is approximately 3.5″ across.

Finished product next to the toys I used as a guide

Here is Thomas after the party…

CAKE!

The fondant was kind of chewy. As I have never had it before, I am unsure if that was due to the age of the fondant, not enough kneading, too thick, improper storage, or if that is just normal.

After we cut off the rear, I realized that by turning it upside down, it looks like a Teenage Mutant Ninja Turtle!

Raphael?

So, I guess if you want a Ninja Turtle cake, just turn Thomas upside down. Hahaha.

It was a lot of work, but I think it was worth it to prove to myself that I could indeed do it.

Unfortunately, this all made me have lots of anxiety and I had trouble eating or sleeping the last two days of cake making and party preparation. Every year, I ask my husband if he wants to have a birthday party for my son. He says yes. I tell him he will have to do all the work. And then I make all the food and clean the house and drive myself crazy trying to make it all as seamless as a television sitcom.

It is stressful trying to live by television standards in the real world. Thank God for my beginner’s luck.

Anyone else out there gotten in over their heads with a birthday cake?

%d bloggers like this: